Wednesday, January 21, 2009

Custom paging in ASP.Net GridView control

In one of my application I tried to copy the Paging style of SharePoint's ListView WebPart, so in that process I find a way to implement custom paging in ASP.Net GridView.
So this article basically describes how we can implement custom paging style in ASP.Net GridView control.


Following is the snapshot of GridView with custom paging :


HTML code for related custom paging :


<asp:GridView ID="gridView" runat="server" PageSize="5"

. . .

<PagerTemplate>


<% if (gridView.PageIndex > 0) { %>

<asp:ImageButton ID="imgBtnPrevious" runat="server"
Style="vertical-align: middle;"
ImageUrl="/_layouts/1033/images/prev.gif"
CommandArgument="Prev" CommandName="Page" />


<% } %>


<%=(gridView.PageIndex * 5) + 1%>
 - <%=(gridView.PageIndex * 5) + gridView.Rows.Count%>


<% if (gridView.PageIndex != (gridView.PageCount - 1)) { %>

<asp:ImageButton ID="imgBtnNext" runat="server"
Style="vertical-align: middle;" ImageUrl="/_layouts/1033/images/next.gif"
CommandArgument="Next" CommandName="Page" />
<% } %>
</PagerTemplate>

. . .

</asp:GridView>


There are two if conditions in the above code, first to hide the left arrow image on GridView's first page and second to hide the right arrow image on GridView's last page display (by using PageIndex and PageCount).

Note : In the above code, I used the default images (left-right arrow) provided by SharePoint.


CSharp (C#) code to handle GridView RowCommand event:


void gridView_OnRowCommand(object sender, CommandEventArgs e)
{
try
{
//Get the current page selected
int intCurIndex = gridView.PageIndex;
//Switch-Case to handle to Previous and Next paging
switch (e.CommandArgument.ToString().ToLower())
{
case "prev":
if (intCurIndex > 0)
gridView.PageIndex = intCurIndex - 1;
break;

case "next":
if (intCurIndex < gridView.PageCount - 1)
gridView.PageIndex = intCurIndex + 1;
break;
}

// popultate the gridview control
DataSet dataset = getDataSet();
//Set the DataSource of GridView and call DataBind
gridView.DataSource = dataset;
gridView.DataBind();
}
catch (Exception)
{
throw;
}
}


I used following table to get the logic for writing page number (just for reference):


Index (Index*5)+1 (Index*5)+RowCount Final Display
0 0*5 + 1 = 1 0*5 + 5 = 5 1 - 5
1 1*5 + 1 = 6 1*5 + 5 = 10 6 - 10
2 2*5 + 1 = 11 2*5 + 5 = 15 11 - 15
3 3*5 + 1 = 16 3*5 + 5 = 20 16 - 20
4 4*5 + 1 = 21 4*5 + 5 = 25 21 - 25


Note : Here the GridView's PageSize is 5.


Reference:
Custom Paging in GridView Control
Friday, January 16, 2009

Error handling in JavaScript

One way to handle error in JavaScript is to use simple try-catch block.


function foo(flag)
{
try
{
//Your code
}
catch(exception)
{
//Log exception in error log using exception object
}
}


In the above approach we have to write try-catch in all required functions.

Second approach is to register a function on window object which will get called always. It is similar to Page_Error function implementation in ASP.Net.


//Register handleError function to handles all browser error messages
window.onerror = handleError;

//Function to handle all errors.
function handleError(exception)
{
//Perform log operation
return true;
}


References :
JavaScript Error Handling

Error Handling

Error handling in javascript

Resource file usage in .Net

This article describes how we can consume values from Resource file in various scenarios.

1) Consume resource value in C# code :


btnCancel.Text = Resources.myResource.ButtonCancel;


2) Consume resource value in HTML / Client control in HTML code :


<input type="button" id="btnAdd" text="<%= Resources.myResource.ButtonAdd %>" />


3) Consume resource value in Server control in HTML code :


<asp:ListItem Text="<%$ Resources:myResource, Yes%>"></asp:ListItem>


4) Consume resource value to set some para / span text in HTML code :


<p>
<asp:Literal runat="server" Text="<%$ Resources:myResource, Success%>" />
</p>


Note : In the above code, myResource is resource file name.

What I get the conclusion by implementing above scenarions are that :
In case of C# code, resource value usage is straight, just Resources.resourceFileName.keyName.
Whereas in case of HTML / ASP.Net code, if I am using HTML / Client control then we have to use "<%= ... %>" (percentage symbol) and in case of Server control we have use "<$= ... %>" (dollar symbol).

Thursday, January 15, 2009

To change style (CSS) of menuitem in SharePoint

This article describes how we can change the style (CSS) of menuitem in SharePoint.

Open the following file (preferably in Visual Studio IDE):

C:\Program Files\Common Files\Microsoft Shared\web server extensions\12\TEMPLATE\LAYOUTS\1033\STYLES\Core.css

To change menuitem cell (Line 1345 --- aprox) :


.ms-menuimagecell
{
background:Maroon
/*background:#ffe6a0 */

url("/_layouts/images/selectednav.gif")
repeat-x;
cursor:pointer;
border:solid 1px #ffffff;
padding:0px;
height:18px;
}


To change menuitem - OnHover (Line 4012 --- aprox) :


.ms-MenuUIItemTableHover
{
background-color:Blue;
border:1px solid Red;

/*background-color:#ffe6a0;
border:1px solid #d2b47a;*/
}


Note : Before making any changes, don't forget to keep the back-up copy of Core.css

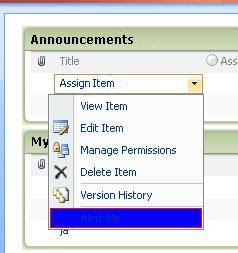
Following will be the effect of above changes :

Customize --- "Welcome UserName" control in SharePoint

This article describes how we can customize --- "Welcome UserName" control in SharePoint.


To edit the existing Welcome control in sharePoint, first you have to open the following file (preferably in Visual Studio IDE):

C:\Program Files\Common Files\Microsoft Shared\web server extensions\12\TEMPLATE\CONTROLTEMPLATES\Welcome.ascx


<%@ Register Tagprefix="SharePoint" Namespace="Microsoft.SharePoint.WebControls" Assembly="Microsoft.SharePoint, Version=12.0.0.0, Culture=neutral, PublicKeyToken=71e9bce111e9429c" %>
<%@ Register Tagprefix="Utilities" Namespace="Microsoft.SharePoint.Utilities" Assembly="Microsoft.SharePoint, Version=12.0.0.0, Culture=neutral, PublicKeyToken=71e9bce111e9429c" %>
<%@ Import Namespace="Microsoft.SharePoint" %>
<%@ Control Language="C#" Inherits="Microsoft.SharePoint.WebControls.Welcome,Microsoft.SharePoint,Version=12.0.0.0,Culture=neutral,PublicKeyToken=71e9bce111e9429c" AutoEventWireup="false" compilationMode="Always" %>
<SharePoint:PersonalActions AccessKey="<%$Resources:wss,personalactions_menu_ak%>" ToolTip="<%$Resources:wss,open_menu%>" runat="server" id="ExplicitLogout" Visible="false">
<CustomTemplate>
<SharePoint:FeatureMenuTemplate runat="server"
FeatureScope="Site"
Location="Microsoft.SharePoint.StandardMenu"
GroupId="PersonalActions"
id="ID_PersonalActionMenu"
UseShortId="true" Visible="true"
>
<SharePoint:MenuItemTemplate runat="server" id="ID_PersonalInformation"
Text="1 <%$Resources:wss,personalactions_personalinformation%>"
Description="<%$Resources:wss,personalactions_personalinformationdescription%>"
MenuGroupId="100"
Sequence="100"
ImageUrl="/_layouts/images/menuprofile.gif"
UseShortId="true" Visible="false"
/>
<SharePoint:MenuItemTemplate runat="server" id="ID_LoginAsDifferentUser"
Text="2 <%$Resources:wss,personalactions_loginasdifferentuser%>"
Description="<%$Resources:wss,personalactions_loginasdifferentuserdescription%>"
MenuGroupId="200"
Sequence="100"
UseShortId="true"
/>
<SharePoint:MenuItemTemplate runat="server" id="ID_RequestAccess"
Text="3 <%$Resources:wss,personalactions_requestaccess%>"
Description="<%$Resources:wss,personalactions_requestaccessdescription%>"
MenuGroupId="200"
UseShortId="true"
Sequence="200"
/>
<SharePoint:MenuItemTemplate runat="server" id="ID_Logout"
Text="4 <%$Resources:wss,personalactions_logout%>"
Description="<%$Resources:wss,personalactions_logoutdescription%>"
MenuGroupId="200"
Sequence="300"
UseShortId="true" Visible="false"
/>
<SharePoint:MenuItemTemplate runat="server" id="ID_PersonalizePage"
Text="5 <%$Resources:wss,personalactions_personalizepage%>"
Description="<%$Resources:wss,personalactions_personalizepagedescription%>"
ImageUrl="/_layouts/images/menupersonalize.gif"
ClientOnClickScript="javascript:MSOLayout_ChangeLayoutMode(true);"
PermissionsString="AddDelPrivateWebParts,UpdatePersonalWebParts"
PermissionMode="Any"
MenuGroupId="300"
Sequence="100"
UseShortId="true"
/>
<SharePoint:MenuItemTemplate runat="server" id="ID_SwitchView"
MenuGroupId="300"
Sequence="200"
UseShortId="true"
/>
<SharePoint:MenuItemTemplate runat="server" id="MSOMenu_RestoreDefaults"
Text="6 <%$Resources:wss,personalactions_restorepagedefaults%>"
Description="<%$Resources:wss,personalactions_restorepagedefaultsdescription%>"
ClientOnClickNavigateUrl="javascript:MSOWebPartPage_RestorePageDefault()"
MenuGroupId="300"
Sequence="300"
UseShortId="true"
/>
</SharePoint:FeatureMenuTemplate>
mmm
</CustomTemplate>
</SharePoint:PersonalActions>
<SharePoint:ApplicationPageLink runat="server" id="ExplicitLogin"
ApplicationPageFileName="Authenticate.aspx" AppendCurrentPageUrl=true
Text="<%$Resources:wss,login_pagetitle%>" style="display:none" Visible="true" />


Note : The above code is modified one... so don't copy-paste it exactly. Also keep the back-up of your original file :)

To hide a particular menuitem, either you can delete its code from the file or set its Visible property to false (as specified in above code for menuitem 1 & 4).

Following will be the result of above code:


To add a new menuitem, you can refer following article:
Custom-action-locations-and-groupid (to add extra menu in drop down)

Google