Friday, December 19, 2008

Dot Net Tips n Tricks

1) To set the textbox's Text property having TextBoxMode property set to Password:
In case of normal textbox, we change its Text property by writing following code :


TextBox txtSample = new TextBox();
txtSample.Text = "Sample";


But in case if we are using textbox for Password purpose, then we have to set its TextBoxMode to Password. So to change its Text property we have to use following code:


TextBox txtPassword = new TextBox();
if (txtPassword.TextMode == TextBoxMode.Password)
{
//newValue is the new value that we want to set.
txtPassword.Attributes.Add("value", newValue);
}


2) Code to remove HTML contents from a string :


public string RemoveHTML(string strHTML)
{
//System.Web.HttpContext.Current.Server.HtmlDecode
return Server.HtmlDecode(Regex.Replace(strHTML, "<(.|\n)*?>", ""));
}

Tuesday, December 9, 2008

ASP.Net Calendar control

Following are the steps to use ASP.Net calendar control in a web page:

1) Add <asp:Calendar ... > control tag in your web page.

HTML code:


<table>
<tr>
<td>
<asp:TextBox ID="txtDate" runat="server" Width="300px"></asp:TextBox>
</td>
<td>
<asp:Button ID="btnDate" runat="server"
Text="..." OnClick="btnDate_Click"></asp:Button>
</td>
</tr>
<tr>
<td>
<asp:Calendar ID="calendar" runat="server" OnDayRender="OnDayRender"
BackColor="#ffffff" Width="300px" Height="300px" Font-Size="14px"
NextPrevFormat="shortmonth" DayNameFormat="firsttwoletters"
Visible="False" OnSelectionChanged="calendar_SelectionChanged">

<TodayDayStyle ForeColor="White" BackColor="Black"></TodayDayStyle>
<NextPrevStyle Font-Size="14px" Font-Bold="True"
ForeColor="#333333"></NextPrevStyle>
<DayHeaderStyle Font-Size="14px" Font-Bold="True"></DayHeaderStyle>
<TitleStyle Font-Size="16px" Font-Bold="True"
BorderWidth="2px" ForeColor="#000055"></TitleStyle>
<OtherMonthDayStyle ForeColor="#CCCCCC"></OtherMonthDayStyle>

</asp:Calendar>
</td>
<td>
</td>
</tr>
</table>


2) As visible property of calendar control is set to false, so on button click event set calendar's visible property to true and also set the selected date of calendar from the textbox.

CSharp (C#) code:


protected void btnDate_Click(object sender, EventArgs e)
{
try
{
if (txtDate.Text.Trim() != "")
calendar.SelectedDate = Convert.ToDateTime(txtDate.Text);
}
catch
{ }

calendar.Visible = true; //showing the calendar.
}


3) Add code to handle the SelectionChanged event of calendar control.

CSharp (C#) code:


protected void calendar_SelectionChanged(object sender, EventArgs e)
{
//Displaying the selected date in TextBox
txtDate.Text = calendar.SelectedDate.ToString("d");
calendar.Visible = false; //hiding the calendar.
}


4) Now to disable the earlier/previous date selection in caledar control, handle OnDayRender event of Calendar control.

CSharp (C#) code:


protected void OnDayRender(Object sender, DayRenderEventArgs e)
{
e.Day.IsSelectable = (e.Day.Date >= DateTime.Today);
//e.Day.IsSelectable = (e.Day.Date >= DateTime.Now);
}


Following is the snapshot of Calendar control in a web page :

Wednesday, December 3, 2008

SharePoint's ListViewWebPart

To use SharePoint's ListViewWebPart directly in your ASPX page, follow these steps:

1) Register Microsoft.SharePoint.WebPartPages namespace in ASPX page :


<%@ Register TagPrefix="WebPartPages" Namespace="Microsoft.SharePoint.WebPartPages"
Assembly="Microsoft.SharePoint, Version=12.0.0.0, Culture=neutral, PublicKeyToken=71e9bce111e9429c" %>


2) Add following ListViewWebPart's html code :


<WebPartPages:ListViewWebPart ID="oListViewWP" runat="server" __WebPartId="{GUID}"
WebPart="true"></WebPartPages:ListViewWebPart>


Note :
Replace GUID in above code either by a newly generated GUID or if you are using SharePoint designer, then SharePoint designer will automatically insert a new GUID in your HTML code when you try to save the ASPX page.


3) Add following server side code to populate data in ListViewWebPart :


SPWeb oWebsite = SPContext.Current.Web;
SPList oList = oWebsite.Lists["Announcements"];

oListViewWP.ListName = oList.ID.ToString("B").ToUpper();
oListViewWP.ViewGuid = oList.Views["MyView"].ID.ToString("B").ToUpper();

oListViewWP.GetDesignTimeHtml();


Note :
Don't forget to write oListViewWP.GetDesignTimeHtml();, otherwise ListViewWebPart will not display any data in it.

Here MyView is just a dummy SPView name, you can use either default SPView or can create a new SPView with only desired columns and settings.

====================================================================
====================================================================

Now if you want to hide/remove the ToolBar from ListViewWebPart, then as per me following are the two ways :
1) Set SuppressWebPartChrome property of WebPart


oListViewWP.SuppressWebPartChrome = true;


2) One of the problem with above code is that it hide the toolBar in ListViewWebPart as well as in the SPList/SPView from which it is displaying the data
( I face this problem, not sure about others :) ).

So, the other alternative is to add following CSS in our code:


<style type="text/css">
.ms-menutoolbar { display: none; }
</style>


Be careful while using the above CSS, because it hide all the ToolBars which uses the .ms-menutoolbar CSS class.


Reference :
MSDN Forum


====================================================================
====================================================================

If you want to apply Filter on ListViewWebPart's column or in other words, display data in ListViewWebPart with only desired column value, then write following code :


string columnValue = "SP";
oListViewWP.FilterString = "FilterField1=Title&FilterValue1=" + columnValue;


The above code results in the display only those records whose column name Title has value SP.

====================================================================
====================================================================

Another major challenge that i faced while using ListView WebPart (or in any normal WebPart) is to change/modify the Empty message or no record message.

The exact message is : There are no items to show in this view of the "ViewName" list. To create a new item, click "New" above.

One of the way to change this message is to modify the ViewEmpty XML node of ListViewXml.

Following code snippet describes the way to change the empty message of ListView WebPart :


//oListViewWP is ListView WebPart instance
XmlDocument xmlDoc = new XmlDocument();
xmlDoc.LoadXml(oListViewWP.ListViewXml);
XmlNode node = xmlDoc.SelectSingleNode("//ViewEmpty");
if (node != null)
{
StringBuilder strB = new StringBuilder();
strB.Append("<HTML><![CDATA[<SPAN Class='ms-vb' style='width:200px;'>]]></HTML>");
strB.Append("<HTML>There is no item to show.</HTML>");
strB.Append("<HTML><![CDATA[</SPAN>]]></HTML>");

node.InnerText = strB.ToString();
}

oListViewWP.ListViewXml = xmlDoc.OuterXml;
oListViewWP.GetDesignTimeHtml();


Note : It is required to set the ListViewXml before GetDesignTimeHtml() function call.


Otherwise, if you are using SharePoint Designer and using/populating ListView WebPart in design time. Then simply search following text :
There are no items to show in this view of the and replace it with your required/desired message.


Another way is to change/modify the text directly in core.resx file that reside at following location :
C:\Program Files\Common Files\Microsoft Shared\web server extensions\12\Resources\core.resx.

Note : If we change the core.resx file, it will be gets reflected in all sites that are using the core.resx resource file.

Friday, November 28, 2008

CAML Tips n Tricks

CAML --- Collaborative Application Markup Language

1) CAML query to fetch a record :


SPWeb oWebsite = SPContext.Current.Web;
SPList oList = oWebsite.Lists["Announcements"];

string strQuery = "<Where>" +
"<Eq>" +
"<FieldRef Name='ID'/>" +
"<Value Type='Number'>1</Value>" +
"</Eq>" +
"</Where>";

SPQuery oQuery = new SPQuery();
oQuery.Query = strQuery;
SPListItemCollection ItemCol = oList.GetItems(oQuery);
if (ItemCol.Count > 0)
{
string strTitle = ItemCol[0]["Title"].ToString();
}


2) CAML query to fetch highest/lowest record :


//To get highest value set Ascending to False else to
//get lowest value don't use it (by-default Ascending is set to True).
string strQuery = "<OrderBy>" +
"<FieldRef Name='ID' Ascending='False' />" +
"</OrderBy>";

SPQuery oQuery = new SPQuery();
oQuery.Query = strQuery;
//Set the RowLimit, so that it fetch only 1 record which is the required one.
oQuery.RowLimit = 1;


3) CAML query to fetch only the required columns instead of all columns (by-default) :


//Specify only the required columns name in ViewFields.
string strViewFields = "<FieldRef Name='ID'/>" +
"<FieldRef Name='Title'/>" +
"<FieldRef Name='Name'/>";

SPQuery oQuery = new SPQuery();
oQuery.ViewFields = strViewFields;


4) CAML query to update SPListItem(s) in batch/bulk :


//Current WebSite.
SPWeb oWebsite = SPContext.Current.Web;
SPQuery oQuery = new SPQuery();

// Set up the variables to be used.
StringBuilder methodBuilder = new StringBuilder();
string batch = string.Empty;

string batchFormat = "<?xml version=\"1.0\" encoding=\"UTF-8\"?>" +
"<ows:Batch OnError=\"Return\">{0}</ows:Batch>";

SPList oList = oWebsite.Lists["Announcements"];
//Get SPList's ID
string listGuid = oList.ID.ToString();

//Here we are going to change 'Title' Column/SPField of SPListItem.
string methodFormat = "<Method ID=\"{0}\">" +
"<SetList>" + listGuid + "</SetList>" +
"<SetVar Name=\"Cmd\">Save</SetVar>" +
"<SetVar Name=\"ID\">{1}</SetVar>" +
"<SetVar Name=\"urn:schemas-microsoft-com:office:office#Title\">{2}</SetVar>" +
"</Method>";

//Set the RowLimit, to optimize the performance.
query.RowLimit = 100;
do
{
SPListItemCollection unprocessedItems = oList.GetItems(query);
//Process all the returned items in this page
// Build the CAML update commands.
for (int i = 0; i < unprocessedItems.Count; i++)
{
//SPListItem ID
int itemID = unprocessedItems[i].ID;
//Set the new value, based on the requirement/logic.
//Here you can use an Array or a Constant string.
string newValue = "Sample";
//string newValue = myArray[i];

methodBuilder.AppendFormat(methodFormat, itemID, itemID, newValue);
}

// Build the final string.
batch = string.Format(batchFormat, methodBuilder.ToString());

// Process the batch of commands.
string batchReturn = oWebsite.ProcessBatchData(batch);

//Gets an object used to obtain the next set of rows in a paged view of a list.
query.ListItemCollectionPosition = unprocessedItems.ListItemCollectionPosition;
} while (query.ListItemCollectionPosition != null);


Reference :
Batch Updating List Items in Windows SharePoint Services 3.0

Wednesday, October 1, 2008

CSS Tips n Tricks

1) Change nested element style with ID (#) and Class (.)


<!DOCTYPE html PUBLIC "-//W3C//DTD XHTML 1.0 Transitional//EN" "http://www.w3.org/TR/xhtml1/DTD/xhtml1-transitional.dtd">
<html xmlns="http://www.w3.org/1999/xhtml">
<head>
<title>CSS Tricks Page</title>
<style type="text/css">
span { font-weight: bold; }
td > span:first-child { color: Green; }
td#tdID > span:first-child { color: Green; }
td.tdClass > span:first-child { color: Green; }
td#tdID span { font-size :large;}
td.tdClass span.spanClass2 { color: Blue; }
td.tdClass span#spanID3 { color: Red; }
td#tdID span.spanClass4 { color: Aqua; }
td#tdID span#spanID5 { color: Maroon; }
</style>
</head>
<body>
<table>
<tr>
<td id="tdID" class="tdClass">
<span id="spanID1" class="spanClass1">First</span><br />
<span id="spanID2" class="spanClass2">Second</span><br />
<span id="spanID3" class="spanClass3">Third</span><br />
<span id="spanID4" class="spanClass4">Fourth</span><br />
<span id="spanID5" class="spanClass5">Fifth</span><br />
</td>
</tr>
</table>
</body>
</html>


Above code snippet displays various ways to change nested element styles.

a) span : To change style of a particular html element (span).

b) td > span:first-child : To change style of first child element (span) of an html elemenet (td).

c) td#tdID > span:first-child : To change style of first child element (span) of an html elemenet with ID (td#tdID).

d) td.tdClass > span:first-child : To change style of first child element (span) of an html elemenet with class (td.tdClass).

e) td#tdID span : To change style of a particular child element (span) of an html element with ID (td#tdID).

f) td.tdClass span.spanClass2 : To change style of a child element with class (span.spanClass2) of an html element with class (td.tdClass).

g) td.tdClass span#spanID3 : To change style of a child element with ID (span#spanID3) of an html element with class (td.tdClass).

h) td#tdID span.spanClass4 : To change style of a child element with class (span.spanClass4) of an html element with ID (td#tdID).

i) td#tdID span#spanID5 : To change style of a child element with ID (span#spanID5) of an html element with ID (td#tdID).

JavaScripts Tips n Tricks

1) ClientID usage :

If you want to access the a Server side TextBox / Control written in ASP.Net from JavaScript code, then first you have get the clientID of that server control and then you can change access it.


<asp:TextBox ID="textBox1" Wrap="true" TextMode="MultiLine" runat="server" Width="215px"></asp:TextBox>

<script type="text/javascript">
var txtID = '<%= textBox1.ClientID %>';

document.getElementById(txtID).innerText = '';
</script>


Note: If an external JavaScript file is referenced in ASPX page, then ASP.NET won't be preprocessing it for server tags (<%...%>), as it isn't part of a ASPX file. You probably need to include the JavaScript code directly in the ASPX file (inline JavaScript code), or set up a global variable in there that is accessed by the JS file when it needs the clientID.


2) String to Number conversion :


var num = Number("11");


3) Case-Insensitive search :


//To make case-insensitive search, used SEARCH instead of INDEXOF.
var sampleString = 'Search case-insensitive based on InputString';
var index = sampleString.search(/InputString/i);


4) unescape() function :


//The unescape() function decodes a string encoded with escape().
var sURL = unescape(window.location.href);


Reference:
JavaScript unescape() Function


5) Trim string :


str = str.replace(/^\s*((?:[\S\s]*\S)?)\s*$/, '$1');


6) Encode string :


str = encodeURIComponent(str);


8) Date Validation :


function isValidDate(strNewDate)
{
var newDate = new Date(strNewDate);

if (newDate.toString() == "NaN" || newDate.toString() == "Invalid Date")
return false;
else
{
var currentDate = new Date();

//Check whether new date is greater than current date.
if( newDate.getTime() < currentDate.getTime() )
return false;
else
return true;
}
}


9) Number/Numeric Validation :


function isValidNumber(strInput)
{
var validChars = "0123456789.";
var isNumber=true;
var char;

for (i = 0; i < strInput.length && isNumber == true; i++)
{
char = strInput.charAt(i);
if (validChars.indexOf(char) == -1)
isNumber = false;
}

return isNumber;
}


Following code checks whether there are any number in a given string :


var regExp = /[0-9]+/g
var strNumber = new String("93932")

if(regExp.test(strNumber))
{
//There are numbers in strNumber.
}
else
{
//There are no numbers in strNumber.
}


10) String Validation :


function isValidString(strInput)
{
strInput = strInput.replace(/^\s*((?:[\S\s]*\S)?)\s*$/, '$1');

if(strInput == '')
return false;
else
return true;
}


11) Cancel an event :


function onClick()
{
window.event.returnValue = false;
return false;
}


12) Do postback or call server side function :


HTML code :


<asp:Button ID="btnUpdate" runat="server" Text="Update" OnClientClick="onUpdateClick();">


JavaScript code :


function onUpdateClick()
{
var evenArgs = "Server Call";
__doPostBack('<%= btnUpdate.ClientID %>',evenArgs);
}


CSharp (C#) code :


protected void Page_Load(object sender, EventArgs e)
{
string controlName = Request.Params.Get("__EVENTTARGET");
if (!string.IsNullOrEmpty(controlName))
{
if (controlName.Contains("btnUpdate"))
update();
}
}


void updateIssue()
{
string eventArgument = Request.Params.Get("__EVENTARGUMENT");
//do other operations
}


13) Get html element's top/left position :


function getPosition(elementID)
{
var obj = document.getElementById(elementID);
var top = obj.offsetTop;
var left = obj.offsetLeft;

while(obj.offsetParent != null)
{
obj = obj.offsetParent;
top += obj.offsetTop;
left += obj.offsetLeft;
}

alert("Top : " + top + " Left : " + left);
}


14) Types of dialog boxes in JavaScript :


alert


alert("Alert dialog box");


confirm


var response = confirm("Do you want to continue?");
if (response)
{
//true if OK is pressed
}
else
{
//false if Cancel is pressed
}


prompt


var response = prompt('Enter your name : ', 'Avi');
if (response) //Equivalent to --- if( (response != null) && (response != '') )
{
alert("You entered : " + response);
}
else
{
alert("You pressed Cancel or no value was entered.");
}


Reference :
Three Types of Dialog Boxes in JavaScript

Thursday, September 11, 2008

IE Developer Toolbar – A nice tool for Web (UI) developer

IE Developer Toolbar is one of the tools that I really like while doing Web (UI) development. Normally we make changes in html code and then see its effect in browser. Whereas with IE Developer Toolbar, I make changes in browser and after getting exact required effect in page, write the required html code.


Problem while configuring the IE Developer Toolbar:
I faced a problem with IE Developer Toolbar installation. After IE Developer Toolbar installation, I was unable to access its various functionalities. So I did following changes to make IE Developer Toolbar fully functional:

1) Open the Windows Components Wizard.

(Control Panel -> Add or Remove Programs -> Add / Remove Windows Components)


2) Uncheck the Internet Explorer Enhanced Security Configuration checkbox.

3) Complete the wizard by clicking the Next / Finish button.


How to open the IE Developer Toolbar pane:
There are 3 ways that I know to open the IE Developer Toolbar in IE-7 browser:

1) Toolbar (at top of the browser, below address bar) -> View -> Explorer Bar -> IE Developer Toolbar


2) Tools (at top-right corner of the browser) -> Toolbars -> Explorer Bar -> IE Developer Toolbar


3) Double arrow (at extreme top-right of the browser) -> IE Developer Toolbar


I liked the 3 rd way to open the IE Developer Toolbar, because it’s very quick to open as compare to other ways.


3 Most nice features / functionalities of IE Developer (as per me):

1) We can see the final rendered html code with or without its applied CSS styles. Here we can easily distinguish that whether the applied style is inline style or external style.


To check the html code with / without style, select a particular html element / node in IE Developer Toolbar pane. Right-click that particular element/node, a pop-up will displays 3 menus in it. Select appropriate menu as per requirement.


2) Ruler: If you want to determine / check the size of some html element like image then this ruler is really a nice tool to use.


To open / hide Ruler, click the Tools menu in IE Developer Toolbar pane, and then click Show / Hide Ruler.


Now select a particular html element (like image in above figure), select the color you want for better visibility (black is default one). Start dragging your mouse by Left-clicking at start point and stop dragging at the required end-point. This displays the co-ordinate of Start and End point, also the Width / Height between the two points.


3) We can change / add new html attribute and its value.


Here in the above diagram, I am adding a new html attribute named background-color to the selected textbox.


I set the background-color value to Green, and press enter to see its effect. This results in the green background-color of the selected textbox (as shown in above figure).
Similarly we can add / delete / update the html attribute and its value.


How to add reference of a DLL/Assembly registered in Global Assembly Cache (GAC)

To add the reference of a DLL/Assembly in .Net project, usually we right-click the Solution in Solution Explorer and click the Add Reference menu.


After clicking the Add Reference menu, Add Reference pop-up dialog box gets open.


If the DLL/assembly is .Net based one, then we click .Net tab else we browse to the DLL/assembly by clicking the Browse tab.

Here the problem comes; if the DLL/assembly is GAC registered then we can’t directly browse to C:\Windows\Assembly and select the DLL/assembly.


For example, I registered a SampleWebParts DLL/assembly in GAC, so to access it first open the Command Prompt. Then go to following location using CD command:

C:\>cd WINDOWS\assembly\GAC_MSIL\SampleWebParts\1.0.0.0__992b220d2c0fa2a6


Note: SampleWebParts is my DLL name. SampleWebParts directory contains only one folder with name starting with 1.0.0. … .


Now if we check the directory contents with Dir command then we can see our required DLL.
So copy the above path and combine it with DLL name.
C:\WINDOWS\assembly\GAC_MSIL\SampleWebParts\1.0.0.0__992b220d2c0fa2a6\SampleWebParts.dll


Paste the above complete path in File Name area of Add Reference dialog box.


Press OK button to add the reference of a DLL/Assembly registered in Global Assembly Cache (GAC) in your desired solution.

Wednesday, August 20, 2008

Registering multiple functions to an event to an html object in JavaScript

The usual common way to register a function to an event to an html object in JavaScript is as follows:


//Registering mouse down event.
document.onmousedown = mouseDown;


The problem in above implementation is if you/someone also want to call some different function(s) on same event and for same html object, then only one function will gets called (probably the function which registered last to the event). So if you want to fire all registered functions of a particular event and of a particular html object, then you have to change your approach to event registration.
To register multiple functions for an event to an html object, you can use following approach:


//Function to add mulitple events to single object.
function AddEvent(obj, eventType, functionName)
{
if (obj.addEventListener)
{
obj.addEventListener(eventType, functionName, false);
return true;
}
else if (obj.attachEvent)
{
var r = obj.attachEvent("on"+eventType, functionName);
return r;
}
else
{
return false;
}
}


//Registering 3 different functions to same event and to same html object.
AddEvent(document, 'mousedown', mouseDownFirst);
AddEvent(document, 'mousedown', mouseDownSecond);
AddEvent(document, 'mousedown', mouseDownThird);


//Functions to test above registered functions.
function mouseDownFirst (){ alert('mouseDownFirst'); }
function mouseDownSecond(){ alert('mouseDownSecond'); }
function mouseDownThird (){ alert('mouseDownThird'); }


Similary to un-register functions we can write following code :


// Remove the specified function registeration for specified event handler on obj object.

//For IE
obj.removeEventListener(eventName, functionName);
//For Non-IE
obj.detachEvent("on"+eventName, functionName);


Note: Sometime to get the effect of updated JavaScript, browser cache deletion required.

Wednesday, July 23, 2008

Decode-Encode in JavaScript/C#

This article basically focused on doing the encoding of special characters in JavaScript and its Decoding in C#. If we go for default libraries/functions provided in JavaScript/C#, then it skips some special characters while doing the Encode/Decode.


Note: To see the complete list of libraries/functions for Encode/Decode in JavaScript/C#, please refer the links provided (at last of this post) for reference purpose.
Following are the list of special characters and its corresponding encoded characters:


var Character = new Array('%', ' ', '~', '!', '@', '#', '$', '^', '&', '*', '(', ')', '{', '}', '[', ']', '=', ':', '/', ',', ';', '?', '+', '\'', '"', '\\');


var URLEncoded = new Array('%25', '%20', '%7E', '%21', '%40', '%23', '%24', '%5E', '%26', '%2A', '%28', '%29', '%7B', '%7D', '%5B', '%5D', '%3D', '%3A', '%2F', '%2C', '%3B', '%3F', '%2B', '%27', '%22', '%5C');


Following are the code snippet for Encoding special characters in JavaScript:


//Variable that contains special characters.
var strSample;
//Trim the string varibale.
strSample = strSample.replace(/^\s*((?:[\S\s]*\S)?)\s*$/, '$1');
//Encode the string variable that contains special characters.
strSample = encodeURIComponent(strSample);
//Encode characters that are not covered in encodeURIComponent function.
var encodedCharacters = new Array('~', '!', '*', '(', ')', '\'');
var decodedCharacters = new Array('%7E', '%21', '%2A', '%28', '%29', '%60');
for(var i=0; i<encodedCharacters.length; i++)
{
strSample =
strSample.replace(encodedCharacters[i], decodedCharacters[i]);
}


Following are the code snippet for Decoding in C#:


//Following function Decode the encoded string,
//before that it replaces the “+” characters with “%2B”.
System.Web.HttpUtility.UrlDecode(strEncodedVariable.Replace("+", "%2B"));


Links for reference:
Comparing escape(), encodeURI(), and encodeURIComponent() --
http://xkr.us/articles/javascript/encode-compare/

INTRODUCTION TO URL ENCODING --
http://www.permadi.com/tutorial/urlEncoding/

The URLEncode and URLDecode Page --
http://www.albionresearch.com/misc/urlencode.php

MSDN HttpUtility.UrlEncode Method --
http://msdn2.microsoft.com/en-us/library/system.web.httputility.urlencode(vs.71).aspx

MSDN HttpUtility.UrlDecode Method (String) --
http://msdn2.microsoft.com/en-us/library/aa332862(VS.71).aspx

Encoding and Decoding URL strings --
http://www.kamath.com/codelibrary/cl006_url.asp

Wednesday, May 28, 2008

Useful operations with sp_MSforeachtable Stored Procedure

Following commands displays how to execute delete, truncate, drop, enable/disable constraints/trigger operations on a DataBase:


---------------------
--Delete all data in the database
EXEC sp_MSForEachTable 'DELETE FROM ?'
EXEC sp_MSForEachTable 'TRUNCATE TABLE ?'

EXEC sp_MSForEachTable
'BEGIN TRY
TRUNCATE TABLE ?
END TRY
BEGIN CATCH
DELETE FROM ?
END CATCH;'
---------------------
--Disable Constraints & Triggers
exec sp_MSforeachtable 'ALTER TABLE ? NOCHECK CONSTRAINT ALL'
exec sp_MSforeachtable 'ALTER TABLE ? DISABLE TRIGGER ALL'
---------------------
--Perform delete operation on all table for cleanup
exec sp_MSforeachtable 'DELETE ?'
---------------------
--Drop all Tables
exec sp_MSforeachtable 'DROP TABLE ?'
---------------------
--Enable Constraints & Triggers again
exec sp_MSforeachtable 'ALTER TABLE ? CHECK CONSTRAINT ALL'
exec sp_MSforeachtable 'ALTER TABLE ? ENABLE TRIGGER ALL'
---------------------


Following commands displays how to execute delete, truncate, drop, enable/disable constraints/trigger operations on a DataBase with printed message in Messages window of SQL Server Management Studio:


---------------------
--Disable Constraints & Triggers
exec sp_MSforeachtable "ALTER TABLE ? NOCHECK CONSTRAINT ALL PRINT'? constraint altered'"
exec sp_MSforeachtable "ALTER TABLE ? DISABLE TRIGGER ALL PRINT'? trigger altered'"
---------------------
--Perform delete operation on all table for cleanup
exec sp_MSforeachtable "DELETE ? PRINT'? deleted'"
--Delete all data in the database
EXEC sp_MSForEachTable "DELETE FROM ? PRINT'? deleted'"
EXEC sp_MSForEachTable "TRUNCATE TABLE ? PRINT'? truncated'"
EXEC sp_MSForEachTable
"BEGIN TRY
TRUNCATE TABLE ? PRINT'? truncated'
END TRY
BEGIN CATCH
DELETE FROM ? PRINT'? deleted'
END CATCH;"
---------------------
--Drop all Tables
exec sp_MSforeachtable "DROP TABLE ? PRINT '? dropped'"
---------------------
--Enable Constraints & Triggers again
exec sp_MSforeachtable "ALTER TABLE ? CHECK CONSTRAINT ALL PRINT'? constraint altered'"
exec sp_MSforeachtable "ALTER TABLE ? ENABLE TRIGGER ALL PRINT'? trigger altered'"
---------------------


Following commands displays how to execute delete, truncate, drop, enable/disable constraints/trigger operations on a DataBase with printed message in Messages window of SQL Server Management Studio and for a particular schema:


---------------------
--Disable Constraints & Triggers
exec sp_MSforeachtable
@command1 = "ALTER TABLE ? NOCHECK CONSTRAINT ALL PRINT'? constraint altered'",
@whereand = "and uid = (SELECT schema_id FROM sys.schemas WHERE name = 'dbo')"
exec sp_MSforeachtable
@command1 = "ALTER TABLE ? DISABLE TRIGGER ALL PRINT'? trigger altered'",
@whereand = "and uid = (SELECT schema_id FROM sys.schemas WHERE name = 'dbo')"
---------------------
--Drop table of particular shcemaID/shemaName
Exec sp_MSforeachtable
@command1 = "DROP TABLE ? PRINT '? dropped'",
@whereand = "and uid = (SELECT schema_id FROM sys.schemas WHERE name = 'dbo')"
---------------------
--Enable Constraints & Triggers again
exec sp_MSforeachtable
@command1 = "ALTER TABLE ? CHECK CONSTRAINT ALL PRINT'? constraint altered'",
@whereand = "and uid = (SELECT schema_id FROM sys.schemas WHERE name = 'dbo')"
exec sp_MSforeachtable
@command1 = "ALTER TABLE ? ENABLE TRIGGER ALL PRINT'? trigger altered'",
@whereand = "and uid = (SELECT schema_id FROM sys.schemas WHERE name = 'dbo')"
---------------------


Following displays how to execute Drop operation on a DataBase for a particular schema and with Like condition:


---------------------
--Drop table of particular shcemaID/shemaName and with name starting with 'Temp_'
Exec sp_MSforeachtable
@command1 = "DROP TABLE ? PRINT '? dropped'",
@whereand = "and uid = (SELECT schema_id FROM sys.schemas WHERE name = 'dbo')
and o.name LIKE 'Temp_%'"
---------------------

Thursday, May 15, 2008

Passing data between two Workflow Activities in ASP.Net Workflow

To test the passing of data between two activities we require following functionalities:
1) A sender activity that sends the data.
2) A receiver activity that receives the data.
3) A workflow that consume both sender and receiver activities.
4) A console application to test the workflow.

Let’s start to implement above steps one-by-one.

1) Creating the sender activity

I created a sender activity named SenderActivity.
In this activity, I am creating two properties, named UserFirstName and UserMiddleName whose CategoryAttribute are set to Input. These two properties will accept/take First Name and Middle Name from designer’s properties box.
Next I created a property names UserName, whose CategoryAttribute is set to Ouput. This property will be used in receiver activity, for getting the processed data of sender activity.
Here I am just combining the FirstName and MiddleName by string operation and assigning it to UserName.

Following is the code snippet of SenderActivity.cs


using System;
using System.ComponentModel;
using System.ComponentModel.Design;
using System.Collections;
using System.Drawing;
using System.Linq;
using System.Workflow.ComponentModel;
using System.Workflow.ComponentModel.Design;
using System.Workflow.ComponentModel.Compiler;
using System.Workflow.ComponentModel.Serialization;
using System.Workflow.Runtime;
using System.Workflow.Activities;
using System.Workflow.Activities.Rules;

namespace MyWorkFlow.Activity
{
public partial class SenderActivity: SequenceActivity
{
string userName = string.Empty;

public SenderActivity()
{
InitializeComponent();
}

protected override ActivityExecutionStatus Execute(ActivityExecutionContext executionContext)
{
if (null == executionContext)
throw new ArgumentNullException("executionContext");

Console.WriteLine("SenderActivity Started ...");
Console.WriteLine("User FirstName is : " + this.UserFirstName);
Console.WriteLine("User MiddleName is : " + this.UserMiddleName);

this.userName = this.UserFirstName + " " + this.UserMiddleName;

Console.WriteLine("SenderActivity End.");
Console.ReadLine();

return base.Execute(executionContext);
}


#region Browsable Attributes


public static DependencyProperty UserFirstNameProperty = DependencyProperty.Register("UserFirstName", typeof(string), typeof(SenderActivity), new PropertyMetadata(DependencyPropertyOptions.Metadata, new Attribute[] { new ValidationOptionAttribute(ValidationOption.Required) }));

[DescriptionAttribute("UserFirstName")]
[CategoryAttribute("Input")]
[BrowsableAttribute(true)]
[DesignerSerializationVisibilityAttribute(DesignerSerializationVisibility.Visible)]
public string UserFirstName
{
get
{
return ((string)(base.GetValue(SenderActivity.UserFirstNameProperty)));
}
set
{
base.SetValue(SenderActivity.UserFirstNameProperty, value);
}
}


public static DependencyProperty UserMiddleNameProperty = DependencyProperty.Register("UserMiddleName", typeof(string), typeof(SenderActivity), new PropertyMetadata(DependencyPropertyOptions.Metadata, new Attribute[] { new ValidationOptionAttribute(ValidationOption.Required) }));

[DescriptionAttribute("UserMiddleName")]
[CategoryAttribute("Input")]
[BrowsableAttribute(true)]
[DesignerSerializationVisibilityAttribute(DesignerSerializationVisibility.Visible)]
public string UserMiddleName
{
get
{
return ((string)(base.GetValue(SenderActivity.UserMiddleNameProperty)));
}
set
{
base.SetValue(SenderActivity.UserMiddleNameProperty, value);
}
}


[DescriptionAttribute("UserName")]
[CategoryAttribute("Output")]
[BrowsableAttribute(true)]
[DesignerSerializationVisibilityAttribute(DesignerSerializationVisibility.Visible)]
public string UserName
{
get
{
return this.userName;
}
}

#endregion Browsable Attributes
}
}


2) Creating the receiver activity

I created a receiver activity named ReceiverActivity. In this activity, I am creating two properties, named UserLastName and SenderActivityName whose CategoryAttribute are set to Input. UserName property will accept/take Last Name from designer’s properties box.SenderActivityName property will be used to get the sender activity name.
Here I am just combining the LastName of receiver’s activity with the Name data of sender’s activity, to form user’s FullName.
To get the data from sender activity, we are using GetActivityByName function to get the activity instance and then calling its property to get the data.


string userName = ((SenderActivity)this.GetActivityByName(this.SenderActivityName, false)).UserName;


Following is the code snippet of ReceiverActivity.cs


using System;
using System.ComponentModel;
using System.ComponentModel.Design;
using System.Collections;
using System.Drawing;
using System.Linq;
using System.Workflow.ComponentModel;
using System.Workflow.ComponentModel.Design;
using System.Workflow.ComponentModel.Compiler;
using System.Workflow.ComponentModel.Serialization;
using System.Workflow.Runtime;
using System.Workflow.Activities;
using System.Workflow.Activities.Rules;

namespace MyWorkFlow.Activity
{
public partial class ReceiverActivity: SequenceActivity
{
public ReceiverActivity()
{
InitializeComponent();
}

protected override ActivityExecutionStatus Execute(ActivityExecutionContext executionContext)
{
if (null == executionContext)
throw new ArgumentNullException("executionContext");

Console.WriteLine("ReceiverActivity Started ...");

string userName = ((SenderActivity)this.GetActivityByName(this.SenderActivityName, false)).UserName;

Console.WriteLine("User Name from SenderActivity is : " + userName);
Console.WriteLine("User LastName is : " + this.UserLastName);

userName += " " + this.UserLastName;

Console.WriteLine("User FullName is : " + userName);
Console.WriteLine("ReceiverActivity End.");
Console.ReadLine();

return base.Execute(executionContext);
}

#region Browsable Attributes

public static DependencyProperty UserLastNameProperty = DependencyProperty.Register("UserLastName", typeof(string), typeof(ReceiverActivity), new PropertyMetadata(DependencyPropertyOptions.Metadata, new Attribute[] { new ValidationOptionAttribute(ValidationOption.Required) }));

[DescriptionAttribute("UserLastName")]
[CategoryAttribute("Input")]
[BrowsableAttribute(true)]
[DesignerSerializationVisibilityAttribute(DesignerSerializationVisibility.Visible)]
public string UserLastName
{
get
{
return ((string)(base.GetValue(ReceiverActivity.UserLastNameProperty)));
}
set
{
base.SetValue(ReceiverActivity.UserLastNameProperty, value);
}
}

public static DependencyProperty SenderActivityNameProperty = DependencyProperty.Register("SenderActivityName", typeof(string), typeof(ReceiverActivity), new PropertyMetadata(DependencyPropertyOptions.Metadata, new Attribute[] { new ValidationOptionAttribute(ValidationOption.Required) }));

[DescriptionAttribute("SenderActivityName")]
[CategoryAttribute("Input")]
[BrowsableAttribute(true)]
[DesignerSerializationVisibilityAttribute(DesignerSerializationVisibility.Visible)]
public string SenderActivityName
{
get
{
return ((string)(base.GetValue(ReceiverActivity.SenderActivityNameProperty)));
}
set
{
base.SetValue(ReceiverActivity.SenderActivityNameProperty, value);
}
}

#endregion Browsable Attributes
}
}


3) Creating Workflow to consume both Sender and Receive activities

After building the project with above two activities, project’s toolbox will displays both custom sender and receiver activities.


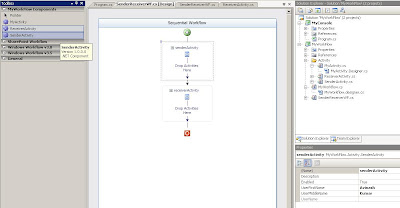
Add a Sequential Workflow in project, here I named it SenderReceiverWF.cs.
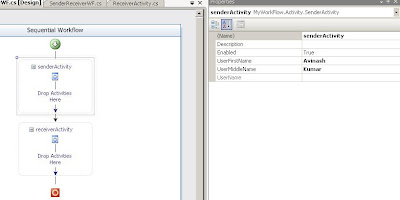
First select SenderActivity in toolbox, drag-n-drop it to workflow designer area. Then select ReceicerActivity in toolbox, drag-n-drop it to workflow designer, just below the SenderActivity (as shown in above figure).Now, select SenderActivity in workflow designer, open its property box. Set the Activity’s name, UserFirstName, and UserMiddleName properties in it (here I am writing senderActivity, Avinash, and Kumar respectively in properties values).


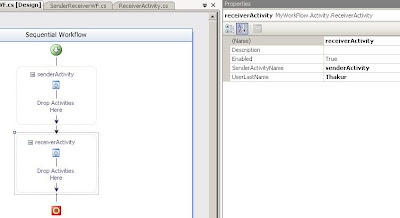
Now, select ReceiverActivity in workflow designer, open its property box. Set Activity’s name, SenderActivityName, and UserLastName properties in it (here I am writing receiverActivity, senderActivity (same name that I used for sender activity), and Thakur respectively in properties values).


Rebuild the project to use it in a console application.


4) Create a Console application to test above workflow

Add a new console project in solution explorer, to test the above workflow. Just consume the workflow in it (explained in detail, in my earlier post).

Following is the code snippet for console application class:


using System;
using System.Collections.Generic;
using System.Linq;
using System.Text;

using System.Threading;
using System.Workflow.Runtime;
using System.Workflow.Runtime.Hosting;

namespace MyConsole
{
class Program
{
static void Main(string[] args)
{
using (WorkflowRuntime workflowRuntime = new WorkflowRuntime())
{
AutoResetEvent waitHandle = new AutoResetEvent(false);

workflowRuntime.WorkflowCompleted += delegate(object sender, WorkflowCompletedEventArgs e)
{
waitHandle.Set();
};

workflowRuntime.WorkflowTerminated += delegate(object sender, WorkflowTerminatedEventArgs e)
{
Console.WriteLine(e.Exception.Message);
waitHandle.Set();
};

WorkflowInstance instance = workflowRuntime.CreateWorkflow(typeof(MyWorkFlow.SenderReceiverWF));
instance.Start();

waitHandle.WaitOne();
}

Console.ReadLine();
}
}
}


Now it’s time to see the output of above work. When we run the application, first SenderActivity will get executed and then ReceiverActivity, as per the sequence defined in the workflow.

Following is the snapshot of SenderActivity’s output (here it’s wait for user input to execute second activity).


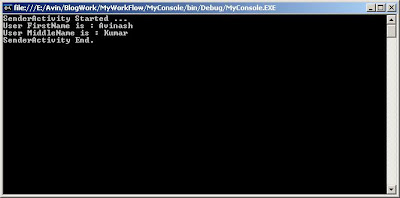
After pressing any key, the second activity i.e. Receiver activity get executed (as shown in below figure).

Tuesday, April 22, 2008

Browsable Attribute/Property of Custom Activity in ASP.Net Workflow

In continuation with my earlier article Custom Activity in ASP.Net Workflow

1) To add a browsable attribute/property in your custom activity, you have insert following code in your custom activity class:


public static DependencyProperty OwnerNameProperty = DependencyProperty.Register("OwnerName", typeof(string), typeof(MyActivity), new PropertyMetadata(DependencyPropertyOptions.Metadata, new Attribute[] { new ValidationOptionAttribute(ValidationOption.Required) }));

[DescriptionAttribute("OwnerName")]
[CategoryAttribute("Input")]
[BrowsableAttribute(true)]
[DesignerSerializationVisibilityAttribute(DesignerSerializationVisibility.Visible)]
public string OwnerName
{
get
{
return ((string)(base.GetValue(MyActivity.OwnerNameProperty)));
}
set
{
base.SetValue(MyActivity.OwnerNameProperty, value);
}
}

Here the custom property name is “OwnerName”.

2) You can access your property in your custom activity, by simply access it like “this.PropertyName”. E.g,


Console.WriteLine("OwnerName : " + this.OwnerName);

In my case, I have inserted the above code in Activity’s “Execute” method.

3) After doing the required changes. To test your custom property, remove your activity from workflow designer and again Drag-n-Drop in Workflow designer from toolbox. Now to set your property, select the activity in workflow designer. In properties window, you will see your custom property against your custom activity. Here you will see “OwnerName” property in “MyActivity”.


4) After setting the property, rebuild the whole application, i.e. Workflow and Console application project. Run the console application. Following is the output window of console application:


Monday, April 21, 2008

Custom Activity in ASP.Net Workflow

1) Open .Net IDE, create a new project. Select “Sequential Workflow Library” under Workflow project template in “New Project” dialog box.


2) Rename workflow class to your desired class name. In my case I renamed it to “MyWorkflow” from “Workflow1”.


3) Create a folder named “Actvity” where you can place your custom activities. Click the “Activity” menu that appears when you try adding new item in Actvity folder in solution explorer.


4) Select “Activity” class template from “Add New Item” dialog box. Rename the activity class to your desired one.


5) In activity class override the “Execute” method. Write your own code in that Execute method.

protected override ActivityExecutionStatus Execute(ActivityExecutionContext executionContext)
{
Console.WriteLine("This is my custom Actvity");

return base.Execute(executionContext);
}


6) Build/Save the application to see your custom activity in the Workflow designer toolbox.


7) Drag-n-Drop your custom activity from toolbox to your workflow designer area.
Rename the activity name if you want.


8) This Drag-n-Drop action will insert the code automatically in “MyWorkflow.Designer.cs” file. Here you can modify the code if you want.

#region Designer generated code

///
/// Required method for Designer support - do not modify
/// the contents of this method with the code editor.
///

[System.Diagnostics.DebuggerNonUserCode]
private void InitializeComponent()
{
this.CanModifyActivities = true;
this.MyActivity = new MyWorkFlow.Activity.MyActivity();
//
// MyActivity
//
this.MyActivity.Name = "MyActivity";
//
// MyWorkflow
//
this.Activities.Add(this.MyActivity);
this.Name = "MyWorkflow";
this.CanModifyActivities = false;

}

#endregion


9) Now comes the part to consume your custom workflow and custom activity. Add a new console project in your solution explorer.


10) Add references for following two dlls in your Console Application reference section:
a. System.Workflow.Activities
b. System.Workflow.ComponentModel
c. System.Workflow.Runtime
Add project reference of your Custom Workflow project, so that you need not to add your Workflow project dll again and again after each modification.


11) Add following “using” directive in your console application class:
a) using System.Threading;
b) using System.Workflow.Runtime;
c) using System.Workflow.Runtime.Hosting;

12) Add following code in your “Main” method:


using (WorkflowRuntime workflowRuntime = new WorkflowRuntime())
{
AutoResetEvent waitHandle = new AutoResetEvent(false);

workflowRuntime.WorkflowCompleted +=
delegate(object sender, WorkflowCompletedEventArgs e)
{
waitHandle.Set();
};

workflowRuntime.WorkflowTerminated +=
delegate(object sender, WorkflowTerminatedEventArgs e)
{
Console.WriteLine(e.Exception.Message);
waitHandle.Set();
};

WorkflowInstance instance =
workflowRuntime.CreateWorkflow(typeof(MyWorkFlow.MyWorkflow));
instance.Start();

waitHandle.WaitOne();
}

The above code adds your custom workflow instance in your console application.

13) Before testing the whole application, you have set your Console application project as “StartUp Project”. You can set your project as StartUp Project by clicking the desired project in solution explorer and click the “Set as StartUp Project” menu.

Also write following code as a last line in your Console application’s main method:

Console.ReadLine();

The above code keep the console screen open, for getting the user response.

14) Now run the application, you will get following console screen:


The above message is written in your Custom activity “Execute” method.

Friday, April 18, 2008

OLAP Cube generation programmatically in C#

OLAP cube generation is divided into 6 major steps:

1) Connect to the Analysis Services :
    Create a connection of AnalysisServices server.

2) Create a Database :
    Create a database in AnalysisServices server and save it.

3) Create a DataSource :
    Add a datasource to the database and set its connection string.

4) Create a DataSourceView :
    a) Create a DataSet.
    b) Add Fact tables in DataSet.
    c) Add Dimension tables in DataSet and Relation between them.
    d) Create a DataSourceView based on the created DataSet.

5) Create the Dimension, Attribute, Hierarchy, and MemberProperty Objects :
    a) Add Dimension to the Database.
    b) Add Dimension Attributes.
    c) Set Attribute usage and source.

6) Create the Cube, MeasureGroup, Measure, and Partition Objects :
    a) Add Cube to the Database and set Cube source to the Data Source View.
    b) Add Measure Group to the Cube.
    c) Add Measure to the Measure Group and set Measure source.
    d) Generate Cube :
        A) Add Dimension to the Cube.
        B) Use Regular Relationship Between Dimension and FactTable Measure Group.
        C) Link TableKey in DimensionTable with TableKey in FactTable Measure Group.
    d) Save Cube and all major objects to the Analysis Services.


After creating the cube, process the cube programmatically else we can process it manually from AnalysisServices Server.


To test the above implementation :
1) Create a console application.
2) Add DLL reference of Microsoft.AnalysisServices and Microsoft.SqlServer.Smo
3) Add CubeGenerator.cs file in project (or copy the code snippet given at the end of this article).
4) Run the Console Application.
    Console window will displays various steps of cube generationg. Press key to exit the application.


We can see the newly generated cube in AnalysisServices server. Drag-n-Drop the Dimension tables and Fact table to see the Cube.


Note : The mentioned code here is self explainatory and commented to understand the cube generation logic.


Following is the complete code snippet to create the OLAP cube programmatically in C# ( for better readability click here ):


using System;
using System.Collections.Generic;
using System.Linq;
using System.Text;

using Microsoft.AnalysisServices;
using System.Data.SqlClient;
using System.Data;
using System.Data.OleDb;

namespace OLAPCube
{
class CubeGenerator
{
static void Main(string[] args)
{
BuildCube();
}

#region Cube Generation.

private static void BuildCube()
{
try
{
Console.WriteLine("Cube creation process started.");
Console.WriteLine("");

string strDBServerName = "LocalHost";
string strProviderName = "msolap";
string strFactTableName = "FactResellerSales";
string strDBName = "AdventureWorksDW";
string strCubeDBName = "OLAPDB";
string strCubeDataSourceName = "OLAPDS";
string strCubeDataSourceViewName = "OLAPDSView";
int intDimensionTableCount = 6;

string[,] strTableNamesAndKeys = { { "DimCurrency", "CurrencyKey", "FactResellerSales", "CurrencyKey" },
{ "DimEmployee", "EmployeeKey", "FactResellerSales", "EmployeeKey" },
{ "DimProduct", "ProductKey", "FactResellerSales", "ProductKey" },
{ "DimPromotion", "PromotionKey", "FactResellerSales", "PromotionKey" },
{ "DimReseller", "ResellerKey", "FactResellerSales", "ResellerKey" },
{ "DimSalesTerritory", "SalesTerritoryKey", "FactResellerSales", "SalesTerritoryKey" },
};


Server objServer = new Server();
Database objDatabase = new Database();
RelationalDataSource objDataSource = new RelationalDataSource();
DataSourceView objDataSourceView = new DataSourceView();
DataSet objDataSet = new DataSet();
Dimension[] objDimensions = new Dimension[intDimensionTableCount];

//Connecting to the Analysis Services.
objServer = (Server)ConnectAnalysisServices(strDBServerName, strProviderName);
//Creating a Database.
objDatabase = (Database)CreateDatabase(objServer, strCubeDBName);
//Creating a DataSource.
objDataSource = (RelationalDataSource)CreateDataSource(objServer, objDatabase, strCubeDataSourceName, strDBServerName, strDBName);
//Creating a DataSourceView.
objDataSet = (DataSet)GenerateDWSchema(strDBServerName, strDBName, strFactTableName, strTableNamesAndKeys, intDimensionTableCount);
objDataSourceView = (DataSourceView)CreateDataSourceView(objDatabase, objDataSource, objDataSet, strCubeDataSourceViewName);
//Creating the Dimension, Attribute, Hierarchy, and MemberProperty Objects.
objDimensions = (Dimension[])CreateDimension(objDatabase, objDataSourceView, strTableNamesAndKeys, intDimensionTableCount);
//Creating the Cube, MeasureGroup, Measure, and Partition Objects.
CreateCube(objDatabase, objDataSourceView, objDataSource, objDimensions, strFactTableName, strTableNamesAndKeys, intDimensionTableCount);

objDatabase.Process(ProcessType.ProcessFull);

Console.WriteLine("Cube created successfully.");
}
catch (Exception ex)
{
Console.WriteLine("Error -> " + ex.Message);
}

Console.WriteLine("");
Console.WriteLine("Press any key to exit.");
Console.ReadLine();
}

#region Connecting to the Analysis Services.
/// <summary>
/// Connecting to the Analysis Services.
/// </summary>
/// <param name="strDBServerName">Database Server Name.</param>
/// <param name="strProviderName">Provider Name.</param>
/// <returns>Database Server instance.</returns>
private static object ConnectAnalysisServices(string strDBServerName, string strProviderName)
{
try
{
Console.WriteLine("Connecting to the Analysis Services ...");

Server objServer = new Server();
string strConnection = "Data Source=" + strDBServerName + ";Provider=" + strProviderName + ";";
//Disconnect from current connection if it's currently connected.
if (objServer.Connected)
objServer.Disconnect();
else
objServer.Connect(strConnection);

return objServer;
}
catch (Exception ex)
{
Console.WriteLine("Error in Connecting to the Analysis Services. Error Message -> " + ex.Message);
return null;
}
}
#endregion Connecting to the Analysis Services.

#region Creating a Database.
/// <summary>
/// Creating a Database.
/// </summary>
/// <param name="objServer">Database Server Name.</param>
/// <param name="strCubeDBName">Cube DB Name.</param>
/// <returns>DB instance.</returns>
private static object CreateDatabase(Server objServer, string strCubeDBName)
{
try
{
Console.WriteLine("Creating a Database ...");

Database objDatabase = new Database();
//Add Database to the Analysis Services.
objDatabase = objServer.Databases.Add(objServer.Databases.GetNewName(strCubeDBName));
//Save Database to the Analysis Services.
objDatabase.Update();

return objDatabase;
}
catch (Exception ex)
{
Console.WriteLine("Error in Creating a Database. Error Message -> " + ex.Message);
return null;
}
}
#endregion Creating a Database.

#region Creating a DataSource.
/// <summary>
/// Creating a DataSource.
/// </summary>
/// <param name="objServer">Database Server Name.</param>
/// <param name="objDatabase">Database Name.</param>
/// <param name="strCubeDataSourceName">Cube DataSource Name.</param>
/// <param name="strDBServerName">DB Server Name.</param>
/// <param name="strDBName">DB Name.</param>
/// <returns>DataSource instance.</returns>
private static object CreateDataSource(Server objServer, Database objDatabase, string strCubeDataSourceName, string strDBServerName, string strDBName)
{
try
{
Console.WriteLine("Creating a DataSource ...");
RelationalDataSource objDataSource = new RelationalDataSource();
//Add Data Source to the Database.
objDataSource = objDatabase.DataSources.Add(objServer.Databases.GetNewName(strCubeDataSourceName));
//objDataSource.ConnectionString = "Provider=SQLOLEDB.1;Initial Catalog=AdventureWorksDW;Data Source=LocalHost;Integrated Security=True;";
objDataSource.ConnectionString = "Provider=SQLNCLI.1; Data Source=" + strDBServerName + "; Initial Catalog=" + strDBName + "; Integrated Security=SSPI;";
objDataSource.Update();

return objDataSource;
}
catch (Exception ex)
{
Console.WriteLine("Error in Creating a DataSource. Error Message -> " + ex.Message);
return null;
}
}
#endregion Creating a DataSource.

#region Creating a DataSourceView.
/// <summary>
/// Creating a DataSourceView.
/// </summary>
/// <param name="strDBServerName">DB Server Name.</param>
/// <param name="strDBName">DB Name.</param>
/// <param name="strFactTableName">FactTable Name.</param>
/// <param name="strTableNamesAndKeys">Array of TableNames and Keys.</param>
/// <param name="intDimensionTableCount">Dimension Table Count.</param>
/// <returns>DataSet instance.</returns>
private static object GenerateDWSchema(string strDBServerName, string strDBName, string strFactTableName, string[,] strTableNamesAndKeys, int intDimensionTableCount)
{
try
{
Console.WriteLine("Creating a DataSourceView ...");
//Create the connection string.
string conxString = "Data Source=" + strDBServerName + "; Initial Catalog=" + strDBName + "; Integrated Security=True;";
//Create the SqlConnection.
SqlConnection objConnection = new SqlConnection(conxString);
DataSet objDataSet = new DataSet();
//Add FactTable in DataSet.
objDataSet = (DataSet)FillDataSet(objConnection, objDataSet, strFactTableName);
//Add table in DataSet and Relation between them.
for (int i = 0; i < intDimensionTableCount; i++)
{
//Retrieve table's schema and assign the table's schema to the DataSet.
//Add primary key to the schema according to the primary key in the tables.
objDataSet = (DataSet)FillDataSet(objConnection, objDataSet, strTableNamesAndKeys[i, 0]);
objDataSet = (DataSet)AddDataTableRelation(objDataSet, strTableNamesAndKeys[i, 0], strTableNamesAndKeys[i, 1], strTableNamesAndKeys[i, 2], strTableNamesAndKeys[i, 3]);
}

return objDataSet;
}
catch (Exception ex)
{
Console.WriteLine("Error in Creating a DataSourceView - GenerateDWSchema. Error Message -> " + ex.Message);
return null;
}
}
/// <summary>
/// Fill the DataSet with DataTables.
/// </summary>
/// <param name="objConnection">Connection instance.</param>
/// <param name="objDataSet">DataSet instance.</param>
/// <param name="strTableName">TableName.</param>
/// <returns>DataSet instance.</returns>
private static object FillDataSet(SqlConnection objConnection, DataSet objDataSet, string strTableName)
{
try
{
string strCommand = "Select * from " + strTableName;
SqlDataAdapter objEmpData = new SqlDataAdapter(strCommand, objConnection);
objEmpData.MissingSchemaAction = MissingSchemaAction.AddWithKey;
objEmpData.FillSchema(objDataSet, SchemaType.Source, strTableName);

return objDataSet;
}
catch (Exception ex)
{
Console.WriteLine("Error in Creating a DataSourceView - FillDataSet. Error Message -> " + ex.Message);
return null;
}
}
/// <summary>
/// Add relations between DataTables of DataSet.
/// </summary>
/// <param name="objDataSet">DataSet instance.</param>
/// <param name="strParentTableName">Parent Table Name (Dimension Table).</param>
/// <param name="strParentTableKey">Parent Table Key.</param>
/// <param name="strChildTableName">Child Table Name (Fact Table).</param>
/// <param name="strChildTableKey">Child Table Key.</param>
/// <returns>DataSet instance.</returns>
private static object AddDataTableRelation(DataSet objDataSet, string strParentTableName, string strParentTableKey, string strChildTableName, string strChildTableKey)
{
try
{
objDataSet.Relations.Add(strChildTableName + "_" + strParentTableName + "_FK", objDataSet.Tables[strParentTableName].Columns[strParentTableKey], objDataSet.Tables[strChildTableName].Columns[strChildTableKey]);

return objDataSet;
}
catch (Exception ex)
{
Console.WriteLine("Error in Creating a DataSourceView - AddDataTableRelation. Error Message -> " + ex.Message);
return null;
}
}


/// <summary>
/// Creating a DataSourceView.
/// </summary>
/// <param name="objDatabase">DB instance.</param>
/// <param name="objDataSource">DataSource instance.</param>
/// <param name="objDataSet">DataSet instance.</param>
/// <param name="strCubeDataSourceViewName">Cube DataSourceView Name.</param>
/// <returns>DataSourceView instance.</returns>
private static object CreateDataSourceView(Database objDatabase, RelationalDataSource objDataSource, DataSet objDataSet, string strCubeDataSourceViewName)
{
try
{
DataSourceView objDataSourceView = new DataSourceView();
//Add Data Source View to the Database.
objDataSourceView = objDatabase.DataSourceViews.Add(objDatabase.DataSourceViews.GetNewName(strCubeDataSourceViewName));
objDataSourceView.DataSourceID = objDataSource.ID;
objDataSourceView.Schema = objDataSet;
objDataSourceView.Update();

return objDataSourceView;
}
catch (Exception ex)
{
Console.WriteLine("Error in Creating a DataSourceView - CreateDataSourceView. Error Message -> " + ex.Message);
return null;
}
}
#endregion Creating a DataSourceView.

#region Creating a Creating the Dimension, Attribute, Hierarchy, and MemberProperty Objects.
/// <summary>
/// Creating the Dimension, Attribute, Hierarchy, and MemberProperty Objects.
/// </summary>
/// <param name="objDatabase">DB instance.</param>
/// <param name="objDataSourceView">DataSource instance.</param>
/// <param name="strTableNamesAndKeys">Array of Table names and keys.</param>
/// <param name="intDimensionTableCount">Dimension table count.</param>
/// <returns>Dimension Array.</returns>
private static object[] CreateDimension(Database objDatabase, DataSourceView objDataSourceView, string[,] strTableNamesAndKeys, int intDimensionTableCount)
{
try
{
Console.WriteLine("Creating the Dimension, Attribute, Hierarchy, and MemberProperty Objects ...");

Dimension[] objDimensions = new Dimension[intDimensionTableCount];
for (int i = 0; i < intDimensionTableCount; i++)
{
objDimensions[i] = (Dimension)GenerateDimension(objDatabase, objDataSourceView, strTableNamesAndKeys[i, 0], strTableNamesAndKeys[i, 1]);
}

////Add Hierarchy and Level
//Hierarchy objHierarchy = objDimension.Hierarchies.Add("ProductByCategory");
//objHierarchy.Levels.Add("Category").SourceAttributeID = objCatKeyAttribute.ID;
//objHierarchy.Levels.Add("Product").SourceAttributeID = objProdKeyAttribute.ID;
////Add Member Property
////objProdKeyAttribute.AttributeRelationships.Add(objProdDescAttribute.ID);
//objDimension.Update();

return objDimensions;
}
catch (Exception ex)
{
Console.WriteLine("Error in Creating the Dimension, Attribute, Hierarchy, and MemberProperty Objects. Error Message -> " + ex.Message);
return null;
}
}
/// <summary>
/// Generate single dimension.
/// </summary>
/// <param name="objDatabase">DB instance.</param>
/// <param name="objDataSourceView">DataSourceView instance.</param>
/// <param name="strTableName">Table name.</param>
/// <param name="strTableKeyName">Table key.</param>
/// <returns>Dimension instance.</returns>
private static object GenerateDimension(Database objDatabase, DataSourceView objDataSourceView, string strTableName, string strTableKeyName)
{
try
{
Dimension objDimension = new Dimension();

//Add Dimension to the Database
objDimension = objDatabase.Dimensions.Add(strTableName);
objDimension.Source = new DataSourceViewBinding(objDataSourceView.ID);
DimensionAttributeCollection objDimensionAttributesColl = objDimension.Attributes;
//Add Dimension Attributes
DimensionAttribute objAttribute = objDimensionAttributesColl.Add(strTableKeyName);
//Set Attribute usage and source
objAttribute.Usage = AttributeUsage.Key;
objAttribute.KeyColumns.Add(strTableName, strTableKeyName, OleDbType.Integer);

objDimension.Update();

return objDimension;
}
catch (Exception ex)
{
Console.WriteLine("Error in Creating the Dimension, Attribute, Hierarchy, and MemberProperty Objects - GenerateDimension. Error Message -> " + ex.Message);
return null;
}
}
#endregion Creating a Creating the Dimension, Attribute, Hierarchy, and MemberProperty Objects.

#region Creating the Cube, MeasureGroup, Measure, and Partition Objects.
/// <summary>
/// Creating the Cube, MeasureGroup, Measure, and Partition Objects.
/// </summary>
/// <param name="objDatabase">DB instance.</param>
/// <param name="objDataSourceView">DataSourceView instance.</param>
/// <param name="objDataSource">DataSource instance.</param>
/// <param name="objDimensions">Dimensions array instance.</param>
/// <param name="strFactTableName">FactTable Name.</param>
/// <param name="strTableNamesAndKeys">Array of Table Names and Keys.</param>
/// <param name="intDimensionTableCount">DimensionTable Count.</param>
private static void CreateCube(Database objDatabase, DataSourceView objDataSourceView, RelationalDataSource objDataSource, Dimension[] objDimensions, string strFactTableName, string[,] strTableNamesAndKeys, int intDimensionTableCount)
{
try
{
Console.WriteLine("Creating the Cube, MeasureGroup, Measure, and Partition Objects ...");
Cube objCube = new Cube();
Measure objSales = new Measure();
Measure objQuantity = new Measure();
MdxScript objTotal = new MdxScript();
String strScript;

Partition objPartition = new Partition();
Command objCommand = new Command();
//Add Cube to the Database and set Cube source to the Data Source View
objCube = objDatabase.Cubes.Add("SampleCube");
objCube.Source = new DataSourceViewBinding(objDataSourceView.ID);
//Add Measure Group to the Cube
//MeasureGroup objMeasureGroup = objCube.MeasureGroups.Add("FactSales");
MeasureGroup objMeasureGroup = objCube.MeasureGroups.Add(strFactTableName);

//Add Measure to the Measure Group and set Measure source
objSales = objMeasureGroup.Measures.Add("Amount");
objSales.Source = new DataItem(strFactTableName, "SalesAmount", OleDbType.Currency);

objQuantity = objMeasureGroup.Measures.Add("Quantity");
objQuantity.Source = new DataItem(strFactTableName, "OrderQuantity", OleDbType.Integer);

////Calculated Member Definition
//strScript = "Calculated; Create Member CurrentCube.[Measures].[Total] As [Measures].[Quantity] * [Measures].[Amount]";
////Add Calculated Member
//objTotal.Name = "Total Sales";
//objCommand.Text = strScript;
//objTotal.Commands.Add(objCommand);
//objCube.MdxScripts.Add(objTotal);

for (int i = 0; i < intDimensionTableCount; i++)
{
GenerateCube(objCube, objDimensions[i], objMeasureGroup, strFactTableName, strTableNamesAndKeys[i, 3]);
}

objPartition = objMeasureGroup.Partitions.Add(strFactTableName);
objPartition.Source = new TableBinding(objDataSource.ID, "dbo", strFactTableName);

objPartition.ProcessingMode = ProcessingMode.Regular;
objPartition.StorageMode = StorageMode.Molap;
//Save Cube and all major objects to the Analysis Services
objCube.Update(UpdateOptions.ExpandFull);
}
catch (Exception ex)
{
Console.WriteLine("Error in Creating the Cube, MeasureGroup, Measure, and Partition Objects. Error Message -> " + ex.Message);
}
}
/// <summary>
/// Generate cube.
/// </summary>
/// <param name="objCube">Cube instance.</param>
/// <param name="objDimension">Dimension instance.</param>
/// <param name="objMeasureGroup">MeasureGroup instance.</param>
/// <param name="strFactTableName">FactTable Name.</param>
/// <param name="strTableKey">Table Key.</param>
private static void GenerateCube(Cube objCube, Dimension objDimension, MeasureGroup objMeasureGroup, string strFactTableName, string strTableKey)
{
try
{
CubeDimension objCubeDim = new CubeDimension();
RegularMeasureGroupDimension objRegMGDim = new RegularMeasureGroupDimension();
MeasureGroupAttribute objMGA = new MeasureGroupAttribute();
//Add Dimension to the Cube
objCubeDim = objCube.Dimensions.Add(objDimension.ID);
//Use Regular Relationship Between Dimension and FactTable Measure Group
objRegMGDim = objMeasureGroup.Dimensions.Add(objCubeDim.ID);
//Link TableKey in DimensionTable with TableKey in FactTable Measure Group
objMGA = objRegMGDim.Attributes.Add(objDimension.KeyAttribute.ID);

objMGA.Type = MeasureGroupAttributeType.Granularity;
objMGA.KeyColumns.Add(strFactTableName, strTableKey, OleDbType.Integer);
}
catch (Exception ex)
{
Console.WriteLine("Error in Creating the Cube, MeasureGroup, Measure, and Partition Objects - GenerateCube. Error Message -> " + ex.Message);
}
}
#endregion Creating the Cube, MeasureGroup, Measure, and Partition Objects.

#endregion Cube Generation.
}
}


Google