Showing posts with label Tips n Tricks. Show all posts

Tuesday, July 12, 2011

Undo "Add To Reject List" in Samsung Mobile

Navigate to following menu options to Add/Edit/Delete any number from reject list:

Settings > Application settings > Call > All calls > Auto reject > Reject list

Here you can find the Reject list.
You can Add/Edit/Delete number which you want to maintain in Reject List.

Reference: Samsung Forum

Friday, January 21, 2011

SharePoint 2010 Tips and Tricks

1. Change Site Icon/Logo of all pages in SharePoint 2010 (Wiki pages and Web part pages)

a. Wiki Pages:

Navigate to following path-
Site > Site Actions > Site Settings > Look and Feel > Title, description, and icon > URL

In URL textbox we can specify either Site Asset’s Image or 14 hive image.
Reference:
Change Wiki Page Site Logo

b. Web Part Pages:

  • Open Web Part page
  • Select Page ribbon Tab on top
  • Select Title Bar Properties
  • Scroll to the right and on the Web Part Page Title Bar properties
  • Specify either Site Asset’s Image or 14 hive image

Reference:
Change Web Part Page Site Logo


2. Enable Anonymous in SharePoint 2010


  1. Open SharePoint 2010 Central Administration
  2. Navigate to following path:
    Central Administration > Application Management > Manage web applications
  3. Select desired Web Application
  4. Click Authentication Providers icon in ribbon tab
  5. On the Authentication Providers pop-up window click on the Default zone.
  6. Under Edit Authentication, check Enable anonymous access and click Save.
  7. Go back to Web Application Management click on the Anonymous Policy icon in ribbon tab.
  8. Under Anonymous Access Restrictions select your Zone and set the Permissions to None – No policy and click Save.
  9. Now, open the desired web application in which we want to set anonymous access.
  10. Navigate to your top level site collection for the web application.
  11. Click the Site Actions > Site Settings > Users and Permissions > Site permissions.
  12. Under Permission Tools ribbon, click Anonymous Access icon
  13. Set the permissions to Entire Web site, or List and Libraries, or Nothing as per requirement
  14. Click OK.
  15. In case of Anonymous access at Web site level:
  • Navigate to Web Site > Site Actions > Site Permissions
  • Click Stop Inheriting Permissions icon in Permission Tools ribbon tab
  • After that we can see Anonymous Access icon in ribbon, click it
  • In Anonymous Access pop-up select desired check box as per requirement
  • Click Ok
        In case of Anonymous access at List and Library level:
  • Navigate to List or Library > List Tool tab > List tab > List Settings icon in ribbon > Permissions and Management > Permissions for this list
  • Click Stop Inheriting Permissions icon in Permission Tools ribbon tab
  • After that we can see Anonymous Access icon in ribbon, click it
  • In Anonymous Access pop-up select desired check box as per requirement
  • Click Ok

Reference:
Enable Anonymous Access 1


3. Steps to use or consume SharePoint List or Libraries RSS functionality

  • If we are planning to use out-of-box RSS functionality of SharePoint’s List or Libraries using out-of-box RSS Viewer web part of SharePoint, then we have to enable Anonymous access at List or Library level.
  • If anonymous access is disabled at List or Library level then we will get following error:
    “The RSS webpart does not support authenticated feeds”

To solve the above error there are following options:

  • Set anonymous access at List or Library level
  • Use 3rd party RSS Feed Reader [available in Codeplex site]
  • Set IIS Authentication from NTLM to Kerberos
    [Central Administration > Application Management > Manage web applications > Select desired Web application > Select Authentication Providers icon in ribbon tab > Click Default link in Authentication Providers pop-up > Edit Authentication pop-up > IIS Authentication Settings > Integrated Windows Authentication > Select Negotiate (Kerberos)]


Note: As per me first option i.e. set anonymous access is best one.


4. Master page branding or UI change in SharePoint 2010

[Note: It’s was my personal experience]
I tried to change the HTML code of default.master or V4.master page/file using SharePoint 2010 Designer (SPD).
SPD reflected all changes, but when I browsed any content page, it didn’t displayed the desired changes.

Solution [as per me]:
I created a copy of default.master or V4.master and renamed it as per requirement. Made all the required HTML changes in it and saved it. Right clicked on the new custom master page and selected the Set as Default Master Page option. Changes get reflected in both SPD and all the browsed content pages.


5. How to hide first tab of SharePoint 2010 site

We need to add following CSS class to hide first tab of SharePoint 2010 site:

.s4-tn li.static:first-child{ 
display: none; 
}


Why we need to hide the first tab???
Ans: There is well known tab selection issue in SharePoint 2010. When we select first tab, second tab always remain selected (wrong tab selection as per UI). To solve this issue, I made the first tab invisible and made the second tab as home page tab. So by this when user clicks the first visible tab, he actually clicks the second tab and hence there is no UI confusion regarding tab selection.


6. Error :
Error occurred in deployment step 'Retract Solution': A deployment or retraction is already under way for the solution "MySolution.wsp", and only one deployment or retraction at a time is supported.

Solution:
a. Enumerates all pending and active deployments in the farm using following command:
stsadm -o enumdeployments

b. Cancel the troublesome Solution that was causing problem [specify the Solution GUID using above command]:
stsadm -o canceldeployment -id <solution GUID>


Reference:
SharePoint deployment or retraction issue


Tuesday, November 24, 2009

Sharepoint Tips n Tricks - Part 2

In continuation with earlier post -
Sharepoint Tips n Tricks

1) Check whether a given SPField exist or not before fetching value from it:


string columnValue = string.Empty;
string columnInternalName = string.Empty;
string fieldName = "Myfield";
SPListItem listItem; //Code to get SPListItem

//Check required SPField exist or not
if (listItem.ParentList.Fields.ContainsField(fieldName))
{
//Get internal name of SPField
columnInternalName = listItem.ParentList.Fields[fieldName].InternalName;

//Fetch column value based on internal name
if (listItem[columnInternalName] != null)
columnValue = listItem[columnInternalName].ToString();
}


2) SharePoint 2007 recommended guidelines for managing site collections, site, lists, and documents according to business needs:

· 50,000 site collections per content database

· 500 MB per site collection (default quota maximum)

· 50 MB file size limit (recommended) up to 2 GB (maximum)

· 2000 items per list view


3) Check whether page is in Edit Mode or not


if (Microsoft.SharePoint.SPContext.Current.FormContext.FormMode == SPControlMode.Display)
{
// your code to support display mode
}
else if(Microsoft.SharePoint.SPContext.Current.FormContext.FormMode = SPControlMode.Edit)
{
// your code to support edit mode
}


OR


WebPartManager wp = WebPartManager.GetCurrentWebPartManager(Page);

if (wp.DisplayMode == WebPartManager.BrowseDisplayMode)
btnLink.InnerText = "Edit Page";
else if (wp.DisplayMode == WebPartManager.DesignDisplayMode)
btnLink.InnerText = "Exit Edit Mode";
else
btnLink.Visible = false;


Reference...
http://www.codeproject.com/KB/sharepoint/SwitchWPMode.aspx

http://mystepstones.wordpress.com/2008/09/23/detecting-the-current-mode-displayedit/


4) SPFeature to deploy page in a SharePoint site


Feature.xml
<?xml version="1.0" encoding="utf-8"?>
<Feature Id="f08674ee-2b0e-41aa-8d28-24e788d03c11"
Title="PageDeployment"
Description="Description for PageDeployment"
Version="12.0.0.0"
Hidden="FALSE"
Scope="Web"
DefaultResourceFile="core"
xmlns="http://schemas.microsoft.com/sharepoint/">
<ElementManifests>
<ElementManifest Location="elements.xml"/>
<ElementFile Location="MyPage.aspx" />
</ElementManifests>
</Feature>


Elements.xml
<?xml version="1.0" encoding="utf-8" ?>
<Elements xmlns="http://schemas.microsoft.com/sharepoint/">
<Module Name="Pages" Path="" Url="">
<File Name=" MyPage.aspx" Url=" MyPage.aspx" IgnoreIfAlreadyExists="FALSE" NavBarHome="True"></File>
</Module>
</Elements>

Wednesday, June 10, 2009

Sharepoint Tips n Tricks

1) Export Spreadsheet menu is not visible in Forms Based application in SharePoint:

Solution: Go tO -


Central Administration > Application Management >
Authentication Providers > Edit Authentication


Checked "Yes" in "Enable Client Integration? "


Notes: Client Integration
Disabling client integration will remove features which launch client applications. Some authentication mechanisms (such as Forms) don't work well with client applications. In this configuration, users will have to work on documents locally and upload their changes.


2) Apply validation controls on SharePoint's DateTimeControl

Following code snippet displays, how to apply following validations on Sharepoint's DateTimeControl:
a) Required field validation
b) Valid date validation
c) Date compare validation


<table cellpadding="0" cellspacing="0" style="font-size: 8pt; font-family: Tahoma;">
<tr>
<td>
<SharePoint:DateTimeControl ID="dateTimeStartDate" runat="server"
DateOnly="true"></SharePoint:DateTimeControl>
</td>
<td></td>
</tr>
<tr>
<td>
<SharePoint:DateTimeControl ID="dateTimeEndDate" runat="server"
DateOnly="true"></SharePoint:DateTimeControl>
</td>
<td>
<asp:RequiredFieldValidator ID="RequiredFieldValidator5" runat="server"
ControlToValidate="dateTimeEndDate$dateTimeEndDateDate"
ErrorMessage="* Required value"
Display="Dynamic"></asp:RequiredFieldValidator>

<asp:CompareValidator ID="CompareValidator2" runat="server"
ForeColor="Red"
ControlToValidate="dateTimeEndDate$dateTimeEndDateDate" Type="Date"
Operator="DataTypeCheck" ErrorMessage="* Please enter an valid date."
Display="Dynamic"></asp:CompareValidator>

<asp:CompareValidator ID="valDate" runat="server" ForeColor="Red"
ControlToValidate="dateTimeEndDate$dateTimeEndDateDate"
ControlToCompare="dateTimeStartDate$dateTimeStartDateDate" Type="Date"
Operator="GreaterThanEqual"
ErrorMessage="* Please enter End Date Greater or Equal to Start Date."
Display="Dynamic"></asp:CompareValidator>
</td>
</tr>
</table>


3) Access denied issue for Forms based user

I did following thing to solve "Access Denied" issue in "Forms Based configuration" ---

Go to :
1) Central Administration > Application Management > Policy for Web Application
2) Select proper Web Application (from top-right)
3) Click "Add User" (top-left)
4) Add required User or Role in it.
5) Grant it "Full Control" (as per requirement).

Available options:
[
Full Control - Has full control.
Full Read - Has full read-only access.
Deny Write - Has no write access.
Deny All - Has no access.
]

Then its work fine for me !!!


4) Operation with SPCoulmn Type - SPFieldChoice

Following code snippet retrieves the values stored in a SPColumn.
You can used these values to populated either Dropdown or Listbox as per you requirement.


SPList list = oWebsite.Lists["SPList_Name"];
SPFieldChoice choice = (SPFieldChoice)list.Fields["Event Name"];

foreach(string s in choice.Choices)
Response.Write(s);


5) Open SharePoint page in edit-mode

There are basically two ways to open a sharepoint page in edit-mode
a) Go to Site Actions (Top-Right) and then selecte Edit page.
b) Append the query string of current page with ?toolpaneview=2
e.g. http://myserver.default.aspx?toolpaneview=2


6) Access AppSettings in SharePoint


//Web config entry
<appSettings>
<add key="UpdateTime" value="300" />
</appSettings>


//C# code to access appsetting
System.Configuration.ConfigurationSettings.AppSettings["UpdateTime"].ToString();

//or new way
System.Configuration.ConfigurationManager.AppSettings["UpdateTime"].ToString();


7) RichTextbox or InputFormTextBox in SharePoint
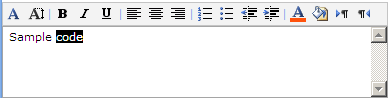


//C# code
InputFormTextBox body = new InputFormTextBox();
body.RichText = true;
body.RichTextMode = Microsoft.SharePoint.SPRichTextMode.Compatible;
body.Rows = 5;
body.TextMode = TextBoxMode.MultiLine;
body.Width = new Unit(300);

this.Controls.Add(body);


Reference--
sharepoint-using-the-rich-text-box-in-a-custom-user-control


8) Session usage in SharePoint

To enable session in your SharePoint pages, open you web application web.config file.

a) Search HttpModule in cofig file, uncomment the following code -

<add name="Session" type="System.Web.SessionState.SessionStateModule" />

b) If session still doesn't work, then set EnableSessionState property to true in page directive.


After enabling the session, if you face some error like...

unable to serialize the session state. in 'stateserver' and 'sqlserver' mode asp.net

Then again open you web.config file and delete following line...

<sessionState mode="StateServer" timeout="60" allowCustomSqlDatabase="true"
partitionResolverType=
"Microsoft.Office.Server.Administration.SqlSessionStateResolver,
Microsoft.Office.Server, Version=12.0.0.0, Culture=neutral,
PublicKeyToken=71e9bce111e9429c" />


9) User Profile in SharePoint


SPSite mySite = SPControl.GetContextSite(Context);
SPWeb myWeb = SPControl.GetContextWeb(Context);
ServerContext context = ServerContext.GetContext(mySite);
UserProfileManager myProfileManager = new UserProfileManager(context);
string CurrentUser = SPContext.Current.Web.CurrentUser.LoginName;
UserProfile myProfile = myProfileManager.GetUserProfile(CurrentUser);

if (myProfile[PropertyConstants.WorkEmail].Value != null)
{
oLabelWorkEmail.Text = myProfile[PropertyConstants.WorkEmail].Value.ToString();
}


References:
How to retrieve current user profile properties
MSDN Forum


10) Run the code with Elevated Privileges

While excuting the code if we face some Privilege or Access issue, then to solve this we can either use SPSecurity.RunWithElevatedPrivileges OR UserToken.

Check following code snippets...


try
{
// Get the Site ID before entering RunWithElevated...
Guid siteID = SPContext.Current.Site.ID;

SPSecurity.RunWithElevatedPrivileges(delegate()
{
using (SPSite site = new SPSite(siteID))
{
// Your code logic here,
//without calling SPContext anywhere inside this method...
}
});
}
catch (SPException spex)
{
//Log exception
}


Note - It is very important to not call the SPContext from within any elevated method, as it'll result in your elevated privileges to cease.


SPUserToken sysToken = SPContext.Current.Site.SystemAccount.UserToken;

using (var spSite = new SPSite(SPContext.Current.Site.ID, sysToken))
{
using (var spWeb = spSite.OpenWeb(SPContext.Current.Web.ID))
{
//Your code
}
}

Tuesday, May 12, 2009

ASP.Net Tips n Tricks

1) Get the full file path (with name) in ASP.Net's FileUpload control.

FileUpload1.PostedFile.FileName returns full file path (including file name),
FileUpload1.FileName returns only file name.

2) Password Validation

Following code snippet display password validation at Client side (JavaScript).
Here password must contains Non-AlphaNumeric character(s) and length should be greater than 6.


<asp:TextBox ID="txtPassword" runat="server" Width="270px"
Enabled="true"></asp:TextBox>
<asp:CustomValidator ID="valPasswd" runat="server"
ControlToValidate="txtPassword" ClientValidationFunction="validatePassword"
Display="Dynamic"
ErrorMessage="* Inadequate password strength."></asp:CustomValidator>

<script type="text/javascript">

function validatePassword(oSrc,args)
{
var isValid = false;

var regExp = /\W/; // /[^a-zA-Z0-9]/;
if( (regExp.test(args.Value)) && (args.Value.length > 6) )
isValid = true;

args.IsValid = isValid;
}

</script>


3) How to get GridView's RowIndex (current row index) in GridView's RowCommand event:

There are two ways to find rowindex, as per me second is comparatively good one
because we need not to do control.Parent.Parent


int rowIndex
= ((GridViewRow)((Control)e.CommandSource).Parent.Parent).RowIndex;

int rowIndex
= ((GridViewRow)((Control)e.CommandSource).NamingContainer).RowIndex;


4) How to search a particular object in a Generic List:

Consider we have a generic list that holds an organization's employees objects,
and we find to a particular employee object based on some input like employee ID.
Here is the code:


List employees = ""; //Logic to fill employees list.
//Search a particular employee based on employee code
//[Here EmployeeCode is one of the variable or properties in Employee class]
Employee employee = employees.Find(delegate(Employee emp)
{ return emp.EmployeeCode == inputValue; });


5) How to find control(s) in ASP.Net GridView's EmptyDataTemplate?

If we are using ASP.Net GridView for displaying records, then to display GridView with no record we have to use EmptyDataTemplate. Inside that we will write all our required controls.

Consider a case... in which EmptyDataTemplate contains a textbox and a button.
If we click button, then GridView's OnRowCommand event will fire.

In GridView_OnRowCommand method to get textbox control we can follow one of the following approaches:


//Approach 1
TextBox txt
= (TextBox)gridviewSP.Controls[0].Controls[0].Controls[0].Controls[1];

//Approach 2
GridViewRow row
= (GridViewRow)((ImageButton)e.CommandSource).NamingContainer;
TextBox txt = row.FindControl("txtName");


As per me second approach is good one, because we need to do blind control search.

In second approach first we are getting GridViewRow, that contains textbox and button. Then in that GridViewRow, with FindControl function find our required textbox.


6) ASP.Net's GridView sorting logic


//C# code

//Call to get GridView's SortOrder and SortExpression...
string sortExpression = e.SortExpression;
bool sorting = GetSortDirection(sortExpression) == "ASC" ? true : false;
.
.


.
.
/// <summary>
/// Gets sort direction for gridview sorting
/// </summary>
/// <param name="column"></param>
/// <returns></returns>
string GetSortDirection(string column)
{
// By default, set the sort direction to ascending.
string sortDirection = "ASC";

// Retrieve the last column that was sorted.
string sortExpression = ViewState["SortExpression"] as string;

if (sortExpression != null)
{
// Check if the same column is being sorted.
// Otherwise, the default value can be returned.
if (sortExpression == column)
{
string lastDirection = ViewState["SortDirection"] as string;
if ((lastDirection != null) && (lastDirection == "ASC"))
{
sortDirection = "DESC";
}
}
}

// Save new values in ViewState.
ViewState["SortDirection"] = sortDirection;
ViewState["SortExpression"] = column;

return sortDirection;
}


7) Operation related to ASP.Net's TextBox with TextMode set to Password :
If we set the TextMode property of ASP:TextBox to Password, then we can't directly access the Text property of TextBox after page postback. Its a known issue and one of the solution is to use Attributes of textbox. We can set the TextBox's Attributes in TextBox_PreRender event and consume its value anywhere we want by using the stored value in Attributes.


<!-- HTML code -->
<asp:TextBox ID="TextBoxPassword" OnPreRender="TextBoxPassword_PreRender"
TextMode="Password" runat="server" Width="150px"></asp:TextBox>


//C# code

protected void TextBoxPassword_PreRender(object sender, EventArgs e)
{
TextBoxPassword.Attributes.Add("value", TextBoxPassword.Text);
}

protected void ButtonAddUser_Click(object sender, EventArgs e)
{
String password = TextBoxPassword.Attributes["value"];
}


8) Operation related to ASP.Net's GridView and DataTable :
This section covers DataTable and its usage in ASP:GridView, especially the Primary Key column and Find functionality of DataTable. [Code are self-explainatory with comments]


//C# code

protected void Page_Load(object sender, EventArgs e)
{
if (!Page.IsPostBack)
{
//Get the DataTable instance and store it
//in ViewState to be used later on.
if (ViewState["EmpDataTable"] == null)
{
ViewState["EmpDataTable"] = CreateDataTable();
}

dataTableEmps = (DataTable)ViewState["EmpDataTable"];

//Set the DataSource and Bind the Grid
GridViewEmps.DataSource = dataTableEmps;
GridViewEmps.DataBind();
}
}


//Create and return a DataTable and its schema.
DataTable CreateDataTable()
{
//Create a DataTable, then add two Columns in it.
DataTable dataTable = new DataTable("Employeess");

dataTable.Columns.Add("EmployeeName", Type.GetType("System.String"));

DataColumn primaryColumn
= new DataColumn("EmployeeID", Type.GetType("System.String"));
dataTable.Columns.Add(primaryColumn);

//Set the PrimaryKey in DataTable
//(to be used in Find functionality of DataTable)
primaryColumn.Unique = true;
dataTable.PrimaryKey = new DataColumn[] { primaryColumn };

return dataTable;
}

//GridView's OnRowDeleting event
protected void GridViewEmps_RowDeleting(object sender
, GridViewDeleteEventArgs e)
{
//Get the control value
string empID
= ((Label)GridViewEmps.Rows[e.RowIndex]
.FindControl("LabelGridViewEmpID")).Text;

//Get the DataTable instance
if (ViewState["EmpDataTable "] == null)
ViewState["EmpDataTable "] = CreateDataTable();
else
dataTableEmps = (DataTable)ViewState["EmpDataTable "];

//Find the row, which we want to delete.
//Only pass the value of Primary key column.
DataRow row = dataTableEmps.Rows.Find(empID);

dataTableEmps.Rows.Remove(row);
GridViewEmps.DataSource = dataTableEmps;
GridViewEmps.DataBind();
}


<!-- HTML code -->
<asp:GridView ID="GridViewEmps" runat="server"
AutoGenerateColumns="false"
OnRowDeleting="GridViewEmps_RowDeleting">
<Columns>
<asp:TemplateField HeaderText="Name">
<ItemTemplate>
<asp:Label ID="LabelGridViewEmpName" runat="server"
Text='<%# Bind("EmployeeName") %>'></asp:Label>
</ItemTemplate>
</asp:TemplateField>
<asp:TemplateField HeaderText="LoginName" Visible="false">
<ItemTemplate>
<asp:Label ID="LabelGridViewEmpID" runat="server"
Text='<%# Bind("EmployeeID") %>'></asp:Label>
</ItemTemplate>
</asp:TemplateField>
</Columns>
</asp:GridView>


9) Function to convert a image/text file into byte array

private byte [] StreamFile(string filename)
{
FileStream fs = new FileStream(filename, FileMode.Open,FileAccess.Read);

// Create a byte array of file stream length
byte[] dataArray = new byte[fs.Length];

//Read block of bytes from stream into the byte array
fs.Read(dataArray,0,System.Convert.ToInt32(fs.Length));

//Close the File Stream
fs.Close();
return dataArray; //return the byte data
}


10) Code to add a new XmlNode / XmlElement in XmlDocument:

string strFilename = "Employees.xml";
XmlDocument xmlDoc = new XmlDocument();

if (File.Exists(strFilename))
{
xmlDoc.Load(strFilename);

XmlElement xElement = xmlDoc.CreateElement("Employee");
string strNewEmployee = "<ID>9</ID>" +
"<Name>Avi</Name>" +
"<Age>25</Age>";

xElement.InnerXml = strNewEmployee;
xmlDoc.DocumentElement.AppendChild(xElement);

xmlDoc.Save("Employees.xml");
}

CAML Tips n Tricks --- Part 2

CAML --- Collaborative Application Markup Language

In continuation with my previous post ---
CAML Tips n Tricks

In this post I am going to discuss about CAML query for batch Update and Delete.

1) BATCH DELETE


/// <summary>
/// Get the CAML query for BATCH DELETION
/// </summary>
/// <param name="spList">SPList instance</param>
/// <returns>SPQuery</returns>
StringBuilder buildBatchDeleteCommand(SPList spList)
{
StringBuilder sbDelete = new StringBuilder();
sbDelete.Append("<?xml version=\"1.0\" encoding=\"UTF-8\"?><Batch>");

string command = "<Method>" +
"<SetList Scope=\"Request\">" + spList.ID + "</SetList>" +
"<SetVar Name=\"ID\">{0}</SetVar>" +
"<SetVar Name=\"Cmd\">Delete</SetVar>" +
"</Method>";

foreach (SPListItem item in spList.Items)
{
sbDelete.Append(string.Format(command, item.ID.ToString()));
}
sbDelete.Append("</Batch>");
return sbDelete;
}

/// <summary>
/// Multiple records Deletion with SPQuery
/// </summary>
void BatchDelete(Object sender, EventArgs e)
{
//Get the SPQuery
StringBuilder finalDeleteAllQuery = buildBatchDeleteCommand(oList);

//Get the SPSite and Allow unsafe updates
SPSite oWebsite = SPContext.Current.Web;
oWebsite.AllowUnsafeUpdates = true;

//Run the Batch command
oWebsite.ProcessBatchData(finalDeleteAllQuery.ToString());

//Disable unsafe updates
oWebsite.AllowUnsafeUpdates = false;
}


2) BATCH UPDATE


/// <summary>
/// Get the CAML query for BATCH UPDATION
/// Here building SPQuery to change "Final Status" column's value
/// </summary>
/// <param name="spList">SPList instance</param>
/// <returns>SPQuery</returns>
StringBuilder buildBatchUpdateCommand(SPList spList)
{
StringBuilder sbDelete = new StringBuilder();
sbDelete.Append("<?xml version=\"1.0\" encoding=\"UTF-8\"?><Batch>");

string command = "<Method>" +
"<SetList Scope=\"Request\">" + spList.ID + "</SetList>" +
"<SetVar Name=\"ID\">{0}</SetVar>" +
"<SetVar Name=\"Cmd\">Save</SetVar>" +
"<SetVar
Name=\"urn:schemas-microsoft-com:office:office
#Final_x0020_Status\">{1}</SetVar>" +
"</Method>";

//SPView specific SPListItems, you can skip following 3 lines
//and directly run foreach on SPList.
//E.g, foreach (SPListItem item in spList.Items)
SPView spView = spList.Views["SPView_NAME"];
SPViewFieldCollection collViewFields = spView.ViewFields;
SPListItemCollection collItemsSrc = spList.GetItems(spView);

foreach (SPListItem item in collItemsSrc)
{
sbDelete.Append(string.Format(command, item.ID.ToString(), "Completed"));
}

sbDelete.Append("</Batch>");
return sbDelete;
}

/// <summary>
/// Multiple records Update with SPQuery
/// </summary>
void BatchUpdate()
{
//Get the SPQuery
StringBuilder finalUpdateAllQuery = buildBatchUpdateCommand(oList);

//Get the SPSite and Allow unsafe updates
SPSite oWebsite = SPContext.Current.Web;
oWebsite.AllowUnsafeUpdates = true;

//Run the Batch command
oWebsite.ProcessBatchData(finalUpdateAllQuery.ToString());

//Disable unsafe updates
oWebsite.AllowUnsafeUpdates = false;
}

Friday, December 19, 2008

Dot Net Tips n Tricks

1) To set the textbox's Text property having TextBoxMode property set to Password:
In case of normal textbox, we change its Text property by writing following code :


TextBox txtSample = new TextBox();
txtSample.Text = "Sample";


But in case if we are using textbox for Password purpose, then we have to set its TextBoxMode to Password. So to change its Text property we have to use following code:


TextBox txtPassword = new TextBox();
if (txtPassword.TextMode == TextBoxMode.Password)
{
//newValue is the new value that we want to set.
txtPassword.Attributes.Add("value", newValue);
}


2) Code to remove HTML contents from a string :


public string RemoveHTML(string strHTML)
{
//System.Web.HttpContext.Current.Server.HtmlDecode
return Server.HtmlDecode(Regex.Replace(strHTML, "<(.|\n)*?>", ""));
}

Friday, November 28, 2008

CAML Tips n Tricks

CAML --- Collaborative Application Markup Language

1) CAML query to fetch a record :


SPWeb oWebsite = SPContext.Current.Web;
SPList oList = oWebsite.Lists["Announcements"];

string strQuery = "<Where>" +
"<Eq>" +
"<FieldRef Name='ID'/>" +
"<Value Type='Number'>1</Value>" +
"</Eq>" +
"</Where>";

SPQuery oQuery = new SPQuery();
oQuery.Query = strQuery;
SPListItemCollection ItemCol = oList.GetItems(oQuery);
if (ItemCol.Count > 0)
{
string strTitle = ItemCol[0]["Title"].ToString();
}


2) CAML query to fetch highest/lowest record :


//To get highest value set Ascending to False else to
//get lowest value don't use it (by-default Ascending is set to True).
string strQuery = "<OrderBy>" +
"<FieldRef Name='ID' Ascending='False' />" +
"</OrderBy>";

SPQuery oQuery = new SPQuery();
oQuery.Query = strQuery;
//Set the RowLimit, so that it fetch only 1 record which is the required one.
oQuery.RowLimit = 1;


3) CAML query to fetch only the required columns instead of all columns (by-default) :


//Specify only the required columns name in ViewFields.
string strViewFields = "<FieldRef Name='ID'/>" +
"<FieldRef Name='Title'/>" +
"<FieldRef Name='Name'/>";

SPQuery oQuery = new SPQuery();
oQuery.ViewFields = strViewFields;


4) CAML query to update SPListItem(s) in batch/bulk :


//Current WebSite.
SPWeb oWebsite = SPContext.Current.Web;
SPQuery oQuery = new SPQuery();

// Set up the variables to be used.
StringBuilder methodBuilder = new StringBuilder();
string batch = string.Empty;

string batchFormat = "<?xml version=\"1.0\" encoding=\"UTF-8\"?>" +
"<ows:Batch OnError=\"Return\">{0}</ows:Batch>";

SPList oList = oWebsite.Lists["Announcements"];
//Get SPList's ID
string listGuid = oList.ID.ToString();

//Here we are going to change 'Title' Column/SPField of SPListItem.
string methodFormat = "<Method ID=\"{0}\">" +
"<SetList>" + listGuid + "</SetList>" +
"<SetVar Name=\"Cmd\">Save</SetVar>" +
"<SetVar Name=\"ID\">{1}</SetVar>" +
"<SetVar Name=\"urn:schemas-microsoft-com:office:office#Title\">{2}</SetVar>" +
"</Method>";

//Set the RowLimit, to optimize the performance.
query.RowLimit = 100;
do
{
SPListItemCollection unprocessedItems = oList.GetItems(query);
//Process all the returned items in this page
// Build the CAML update commands.
for (int i = 0; i < unprocessedItems.Count; i++)
{
//SPListItem ID
int itemID = unprocessedItems[i].ID;
//Set the new value, based on the requirement/logic.
//Here you can use an Array or a Constant string.
string newValue = "Sample";
//string newValue = myArray[i];

methodBuilder.AppendFormat(methodFormat, itemID, itemID, newValue);
}

// Build the final string.
batch = string.Format(batchFormat, methodBuilder.ToString());

// Process the batch of commands.
string batchReturn = oWebsite.ProcessBatchData(batch);

//Gets an object used to obtain the next set of rows in a paged view of a list.
query.ListItemCollectionPosition = unprocessedItems.ListItemCollectionPosition;
} while (query.ListItemCollectionPosition != null);


Reference :
Batch Updating List Items in Windows SharePoint Services 3.0

Wednesday, October 1, 2008

CSS Tips n Tricks

1) Change nested element style with ID (#) and Class (.)


<!DOCTYPE html PUBLIC "-//W3C//DTD XHTML 1.0 Transitional//EN" "http://www.w3.org/TR/xhtml1/DTD/xhtml1-transitional.dtd">
<html xmlns="http://www.w3.org/1999/xhtml">
<head>
<title>CSS Tricks Page</title>
<style type="text/css">
span { font-weight: bold; }
td > span:first-child { color: Green; }
td#tdID > span:first-child { color: Green; }
td.tdClass > span:first-child { color: Green; }
td#tdID span { font-size :large;}
td.tdClass span.spanClass2 { color: Blue; }
td.tdClass span#spanID3 { color: Red; }
td#tdID span.spanClass4 { color: Aqua; }
td#tdID span#spanID5 { color: Maroon; }
</style>
</head>
<body>
<table>
<tr>
<td id="tdID" class="tdClass">
<span id="spanID1" class="spanClass1">First</span><br />
<span id="spanID2" class="spanClass2">Second</span><br />
<span id="spanID3" class="spanClass3">Third</span><br />
<span id="spanID4" class="spanClass4">Fourth</span><br />
<span id="spanID5" class="spanClass5">Fifth</span><br />
</td>
</tr>
</table>
</body>
</html>


Above code snippet displays various ways to change nested element styles.

a) span : To change style of a particular html element (span).

b) td > span:first-child : To change style of first child element (span) of an html elemenet (td).

c) td#tdID > span:first-child : To change style of first child element (span) of an html elemenet with ID (td#tdID).

d) td.tdClass > span:first-child : To change style of first child element (span) of an html elemenet with class (td.tdClass).

e) td#tdID span : To change style of a particular child element (span) of an html element with ID (td#tdID).

f) td.tdClass span.spanClass2 : To change style of a child element with class (span.spanClass2) of an html element with class (td.tdClass).

g) td.tdClass span#spanID3 : To change style of a child element with ID (span#spanID3) of an html element with class (td.tdClass).

h) td#tdID span.spanClass4 : To change style of a child element with class (span.spanClass4) of an html element with ID (td#tdID).

i) td#tdID span#spanID5 : To change style of a child element with ID (span#spanID5) of an html element with ID (td#tdID).

JavaScripts Tips n Tricks

1) ClientID usage :

If you want to access the a Server side TextBox / Control written in ASP.Net from JavaScript code, then first you have get the clientID of that server control and then you can change access it.


<asp:TextBox ID="textBox1" Wrap="true" TextMode="MultiLine" runat="server" Width="215px"></asp:TextBox>

<script type="text/javascript">
var txtID = '<%= textBox1.ClientID %>';

document.getElementById(txtID).innerText = '';
</script>


Note: If an external JavaScript file is referenced in ASPX page, then ASP.NET won't be preprocessing it for server tags (<%...%>), as it isn't part of a ASPX file. You probably need to include the JavaScript code directly in the ASPX file (inline JavaScript code), or set up a global variable in there that is accessed by the JS file when it needs the clientID.


2) String to Number conversion :


var num = Number("11");


3) Case-Insensitive search :


//To make case-insensitive search, used SEARCH instead of INDEXOF.
var sampleString = 'Search case-insensitive based on InputString';
var index = sampleString.search(/InputString/i);


4) unescape() function :


//The unescape() function decodes a string encoded with escape().
var sURL = unescape(window.location.href);


Reference:
JavaScript unescape() Function


5) Trim string :


str = str.replace(/^\s*((?:[\S\s]*\S)?)\s*$/, '$1');


6) Encode string :


str = encodeURIComponent(str);


8) Date Validation :


function isValidDate(strNewDate)
{
var newDate = new Date(strNewDate);

if (newDate.toString() == "NaN" || newDate.toString() == "Invalid Date")
return false;
else
{
var currentDate = new Date();

//Check whether new date is greater than current date.
if( newDate.getTime() < currentDate.getTime() )
return false;
else
return true;
}
}


9) Number/Numeric Validation :


function isValidNumber(strInput)
{
var validChars = "0123456789.";
var isNumber=true;
var char;

for (i = 0; i < strInput.length && isNumber == true; i++)
{
char = strInput.charAt(i);
if (validChars.indexOf(char) == -1)
isNumber = false;
}

return isNumber;
}


Following code checks whether there are any number in a given string :


var regExp = /[0-9]+/g
var strNumber = new String("93932")

if(regExp.test(strNumber))
{
//There are numbers in strNumber.
}
else
{
//There are no numbers in strNumber.
}


10) String Validation :


function isValidString(strInput)
{
strInput = strInput.replace(/^\s*((?:[\S\s]*\S)?)\s*$/, '$1');

if(strInput == '')
return false;
else
return true;
}


11) Cancel an event :


function onClick()
{
window.event.returnValue = false;
return false;
}


12) Do postback or call server side function :


HTML code :


<asp:Button ID="btnUpdate" runat="server" Text="Update" OnClientClick="onUpdateClick();">


JavaScript code :


function onUpdateClick()
{
var evenArgs = "Server Call";
__doPostBack('<%= btnUpdate.ClientID %>',evenArgs);
}


CSharp (C#) code :


protected void Page_Load(object sender, EventArgs e)
{
string controlName = Request.Params.Get("__EVENTTARGET");
if (!string.IsNullOrEmpty(controlName))
{
if (controlName.Contains("btnUpdate"))
update();
}
}


void updateIssue()
{
string eventArgument = Request.Params.Get("__EVENTARGUMENT");
//do other operations
}


13) Get html element's top/left position :


function getPosition(elementID)
{
var obj = document.getElementById(elementID);
var top = obj.offsetTop;
var left = obj.offsetLeft;

while(obj.offsetParent != null)
{
obj = obj.offsetParent;
top += obj.offsetTop;
left += obj.offsetLeft;
}

alert("Top : " + top + " Left : " + left);
}


14) Types of dialog boxes in JavaScript :


alert


alert("Alert dialog box");


confirm


var response = confirm("Do you want to continue?");
if (response)
{
//true if OK is pressed
}
else
{
//false if Cancel is pressed
}


prompt


var response = prompt('Enter your name : ', 'Avi');
if (response) //Equivalent to --- if( (response != null) && (response != '') )
{
alert("You entered : " + response);
}
else
{
alert("You pressed Cancel or no value was entered.");
}


Reference :
Three Types of Dialog Boxes in JavaScript

Google