Thursday, September 11, 2008

IE Developer Toolbar – A nice tool for Web (UI) developer

IE Developer Toolbar is one of the tools that I really like while doing Web (UI) development. Normally we make changes in html code and then see its effect in browser. Whereas with IE Developer Toolbar, I make changes in browser and after getting exact required effect in page, write the required html code.


Problem while configuring the IE Developer Toolbar:
I faced a problem with IE Developer Toolbar installation. After IE Developer Toolbar installation, I was unable to access its various functionalities. So I did following changes to make IE Developer Toolbar fully functional:

1) Open the Windows Components Wizard.

(Control Panel -> Add or Remove Programs -> Add / Remove Windows Components)


2) Uncheck the Internet Explorer Enhanced Security Configuration checkbox.

3) Complete the wizard by clicking the Next / Finish button.


How to open the IE Developer Toolbar pane:
There are 3 ways that I know to open the IE Developer Toolbar in IE-7 browser:

1) Toolbar (at top of the browser, below address bar) -> View -> Explorer Bar -> IE Developer Toolbar


2) Tools (at top-right corner of the browser) -> Toolbars -> Explorer Bar -> IE Developer Toolbar


3) Double arrow (at extreme top-right of the browser) -> IE Developer Toolbar


I liked the 3 rd way to open the IE Developer Toolbar, because it’s very quick to open as compare to other ways.


3 Most nice features / functionalities of IE Developer (as per me):

1) We can see the final rendered html code with or without its applied CSS styles. Here we can easily distinguish that whether the applied style is inline style or external style.


To check the html code with / without style, select a particular html element / node in IE Developer Toolbar pane. Right-click that particular element/node, a pop-up will displays 3 menus in it. Select appropriate menu as per requirement.


2) Ruler: If you want to determine / check the size of some html element like image then this ruler is really a nice tool to use.


To open / hide Ruler, click the Tools menu in IE Developer Toolbar pane, and then click Show / Hide Ruler.


Now select a particular html element (like image in above figure), select the color you want for better visibility (black is default one). Start dragging your mouse by Left-clicking at start point and stop dragging at the required end-point. This displays the co-ordinate of Start and End point, also the Width / Height between the two points.


3) We can change / add new html attribute and its value.


Here in the above diagram, I am adding a new html attribute named background-color to the selected textbox.


I set the background-color value to Green, and press enter to see its effect. This results in the green background-color of the selected textbox (as shown in above figure).
Similarly we can add / delete / update the html attribute and its value.


How to add reference of a DLL/Assembly registered in Global Assembly Cache (GAC)

To add the reference of a DLL/Assembly in .Net project, usually we right-click the Solution in Solution Explorer and click the Add Reference menu.


After clicking the Add Reference menu, Add Reference pop-up dialog box gets open.


If the DLL/assembly is .Net based one, then we click .Net tab else we browse to the DLL/assembly by clicking the Browse tab.

Here the problem comes; if the DLL/assembly is GAC registered then we can’t directly browse to C:\Windows\Assembly and select the DLL/assembly.


For example, I registered a SampleWebParts DLL/assembly in GAC, so to access it first open the Command Prompt. Then go to following location using CD command:

C:\>cd WINDOWS\assembly\GAC_MSIL\SampleWebParts\1.0.0.0__992b220d2c0fa2a6


Note: SampleWebParts is my DLL name. SampleWebParts directory contains only one folder with name starting with 1.0.0. … .


Now if we check the directory contents with Dir command then we can see our required DLL.
So copy the above path and combine it with DLL name.
C:\WINDOWS\assembly\GAC_MSIL\SampleWebParts\1.0.0.0__992b220d2c0fa2a6\SampleWebParts.dll


Paste the above complete path in File Name area of Add Reference dialog box.


Press OK button to add the reference of a DLL/Assembly registered in Global Assembly Cache (GAC) in your desired solution.

Wednesday, August 20, 2008

Registering multiple functions to an event to an html object in JavaScript

The usual common way to register a function to an event to an html object in JavaScript is as follows:


//Registering mouse down event.
document.onmousedown = mouseDown;


The problem in above implementation is if you/someone also want to call some different function(s) on same event and for same html object, then only one function will gets called (probably the function which registered last to the event). So if you want to fire all registered functions of a particular event and of a particular html object, then you have to change your approach to event registration.
To register multiple functions for an event to an html object, you can use following approach:


//Function to add mulitple events to single object.
function AddEvent(obj, eventType, functionName)
{
if (obj.addEventListener)
{
obj.addEventListener(eventType, functionName, false);
return true;
}
else if (obj.attachEvent)
{
var r = obj.attachEvent("on"+eventType, functionName);
return r;
}
else
{
return false;
}
}


//Registering 3 different functions to same event and to same html object.
AddEvent(document, 'mousedown', mouseDownFirst);
AddEvent(document, 'mousedown', mouseDownSecond);
AddEvent(document, 'mousedown', mouseDownThird);


//Functions to test above registered functions.
function mouseDownFirst (){ alert('mouseDownFirst'); }
function mouseDownSecond(){ alert('mouseDownSecond'); }
function mouseDownThird (){ alert('mouseDownThird'); }


Similary to un-register functions we can write following code :


// Remove the specified function registeration for specified event handler on obj object.

//For IE
obj.removeEventListener(eventName, functionName);
//For Non-IE
obj.detachEvent("on"+eventName, functionName);


Note: Sometime to get the effect of updated JavaScript, browser cache deletion required.

Wednesday, July 23, 2008

Decode-Encode in JavaScript/C#

This article basically focused on doing the encoding of special characters in JavaScript and its Decoding in C#. If we go for default libraries/functions provided in JavaScript/C#, then it skips some special characters while doing the Encode/Decode.


Note: To see the complete list of libraries/functions for Encode/Decode in JavaScript/C#, please refer the links provided (at last of this post) for reference purpose.
Following are the list of special characters and its corresponding encoded characters:


var Character = new Array('%', ' ', '~', '!', '@', '#', '$', '^', '&', '*', '(', ')', '{', '}', '[', ']', '=', ':', '/', ',', ';', '?', '+', '\'', '"', '\\');


var URLEncoded = new Array('%25', '%20', '%7E', '%21', '%40', '%23', '%24', '%5E', '%26', '%2A', '%28', '%29', '%7B', '%7D', '%5B', '%5D', '%3D', '%3A', '%2F', '%2C', '%3B', '%3F', '%2B', '%27', '%22', '%5C');


Following are the code snippet for Encoding special characters in JavaScript:


//Variable that contains special characters.
var strSample;
//Trim the string varibale.
strSample = strSample.replace(/^\s*((?:[\S\s]*\S)?)\s*$/, '$1');
//Encode the string variable that contains special characters.
strSample = encodeURIComponent(strSample);
//Encode characters that are not covered in encodeURIComponent function.
var encodedCharacters = new Array('~', '!', '*', '(', ')', '\'');
var decodedCharacters = new Array('%7E', '%21', '%2A', '%28', '%29', '%60');
for(var i=0; i<encodedCharacters.length; i++)
{
strSample =
strSample.replace(encodedCharacters[i], decodedCharacters[i]);
}


Following are the code snippet for Decoding in C#:


//Following function Decode the encoded string,
//before that it replaces the “+” characters with “%2B”.
System.Web.HttpUtility.UrlDecode(strEncodedVariable.Replace("+", "%2B"));


Links for reference:
Comparing escape(), encodeURI(), and encodeURIComponent() --
http://xkr.us/articles/javascript/encode-compare/

INTRODUCTION TO URL ENCODING --
http://www.permadi.com/tutorial/urlEncoding/

The URLEncode and URLDecode Page --
http://www.albionresearch.com/misc/urlencode.php

MSDN HttpUtility.UrlEncode Method --
http://msdn2.microsoft.com/en-us/library/system.web.httputility.urlencode(vs.71).aspx

MSDN HttpUtility.UrlDecode Method (String) --
http://msdn2.microsoft.com/en-us/library/aa332862(VS.71).aspx

Encoding and Decoding URL strings --
http://www.kamath.com/codelibrary/cl006_url.asp

Wednesday, May 28, 2008

Useful operations with sp_MSforeachtable Stored Procedure

Following commands displays how to execute delete, truncate, drop, enable/disable constraints/trigger operations on a DataBase:


---------------------
--Delete all data in the database
EXEC sp_MSForEachTable 'DELETE FROM ?'
EXEC sp_MSForEachTable 'TRUNCATE TABLE ?'

EXEC sp_MSForEachTable
'BEGIN TRY
TRUNCATE TABLE ?
END TRY
BEGIN CATCH
DELETE FROM ?
END CATCH;'
---------------------
--Disable Constraints & Triggers
exec sp_MSforeachtable 'ALTER TABLE ? NOCHECK CONSTRAINT ALL'
exec sp_MSforeachtable 'ALTER TABLE ? DISABLE TRIGGER ALL'
---------------------
--Perform delete operation on all table for cleanup
exec sp_MSforeachtable 'DELETE ?'
---------------------
--Drop all Tables
exec sp_MSforeachtable 'DROP TABLE ?'
---------------------
--Enable Constraints & Triggers again
exec sp_MSforeachtable 'ALTER TABLE ? CHECK CONSTRAINT ALL'
exec sp_MSforeachtable 'ALTER TABLE ? ENABLE TRIGGER ALL'
---------------------


Following commands displays how to execute delete, truncate, drop, enable/disable constraints/trigger operations on a DataBase with printed message in Messages window of SQL Server Management Studio:


---------------------
--Disable Constraints & Triggers
exec sp_MSforeachtable "ALTER TABLE ? NOCHECK CONSTRAINT ALL PRINT'? constraint altered'"
exec sp_MSforeachtable "ALTER TABLE ? DISABLE TRIGGER ALL PRINT'? trigger altered'"
---------------------
--Perform delete operation on all table for cleanup
exec sp_MSforeachtable "DELETE ? PRINT'? deleted'"
--Delete all data in the database
EXEC sp_MSForEachTable "DELETE FROM ? PRINT'? deleted'"
EXEC sp_MSForEachTable "TRUNCATE TABLE ? PRINT'? truncated'"
EXEC sp_MSForEachTable
"BEGIN TRY
TRUNCATE TABLE ? PRINT'? truncated'
END TRY
BEGIN CATCH
DELETE FROM ? PRINT'? deleted'
END CATCH;"
---------------------
--Drop all Tables
exec sp_MSforeachtable "DROP TABLE ? PRINT '? dropped'"
---------------------
--Enable Constraints & Triggers again
exec sp_MSforeachtable "ALTER TABLE ? CHECK CONSTRAINT ALL PRINT'? constraint altered'"
exec sp_MSforeachtable "ALTER TABLE ? ENABLE TRIGGER ALL PRINT'? trigger altered'"
---------------------


Following commands displays how to execute delete, truncate, drop, enable/disable constraints/trigger operations on a DataBase with printed message in Messages window of SQL Server Management Studio and for a particular schema:


---------------------
--Disable Constraints & Triggers
exec sp_MSforeachtable
@command1 = "ALTER TABLE ? NOCHECK CONSTRAINT ALL PRINT'? constraint altered'",
@whereand = "and uid = (SELECT schema_id FROM sys.schemas WHERE name = 'dbo')"
exec sp_MSforeachtable
@command1 = "ALTER TABLE ? DISABLE TRIGGER ALL PRINT'? trigger altered'",
@whereand = "and uid = (SELECT schema_id FROM sys.schemas WHERE name = 'dbo')"
---------------------
--Drop table of particular shcemaID/shemaName
Exec sp_MSforeachtable
@command1 = "DROP TABLE ? PRINT '? dropped'",
@whereand = "and uid = (SELECT schema_id FROM sys.schemas WHERE name = 'dbo')"
---------------------
--Enable Constraints & Triggers again
exec sp_MSforeachtable
@command1 = "ALTER TABLE ? CHECK CONSTRAINT ALL PRINT'? constraint altered'",
@whereand = "and uid = (SELECT schema_id FROM sys.schemas WHERE name = 'dbo')"
exec sp_MSforeachtable
@command1 = "ALTER TABLE ? ENABLE TRIGGER ALL PRINT'? trigger altered'",
@whereand = "and uid = (SELECT schema_id FROM sys.schemas WHERE name = 'dbo')"
---------------------


Following displays how to execute Drop operation on a DataBase for a particular schema and with Like condition:


---------------------
--Drop table of particular shcemaID/shemaName and with name starting with 'Temp_'
Exec sp_MSforeachtable
@command1 = "DROP TABLE ? PRINT '? dropped'",
@whereand = "and uid = (SELECT schema_id FROM sys.schemas WHERE name = 'dbo')
and o.name LIKE 'Temp_%'"
---------------------

Thursday, May 15, 2008

Passing data between two Workflow Activities in ASP.Net Workflow

To test the passing of data between two activities we require following functionalities:
1) A sender activity that sends the data.
2) A receiver activity that receives the data.
3) A workflow that consume both sender and receiver activities.
4) A console application to test the workflow.

Let’s start to implement above steps one-by-one.

1) Creating the sender activity

I created a sender activity named SenderActivity.
In this activity, I am creating two properties, named UserFirstName and UserMiddleName whose CategoryAttribute are set to Input. These two properties will accept/take First Name and Middle Name from designer’s properties box.
Next I created a property names UserName, whose CategoryAttribute is set to Ouput. This property will be used in receiver activity, for getting the processed data of sender activity.
Here I am just combining the FirstName and MiddleName by string operation and assigning it to UserName.

Following is the code snippet of SenderActivity.cs


using System;
using System.ComponentModel;
using System.ComponentModel.Design;
using System.Collections;
using System.Drawing;
using System.Linq;
using System.Workflow.ComponentModel;
using System.Workflow.ComponentModel.Design;
using System.Workflow.ComponentModel.Compiler;
using System.Workflow.ComponentModel.Serialization;
using System.Workflow.Runtime;
using System.Workflow.Activities;
using System.Workflow.Activities.Rules;

namespace MyWorkFlow.Activity
{
public partial class SenderActivity: SequenceActivity
{
string userName = string.Empty;

public SenderActivity()
{
InitializeComponent();
}

protected override ActivityExecutionStatus Execute(ActivityExecutionContext executionContext)
{
if (null == executionContext)
throw new ArgumentNullException("executionContext");

Console.WriteLine("SenderActivity Started ...");
Console.WriteLine("User FirstName is : " + this.UserFirstName);
Console.WriteLine("User MiddleName is : " + this.UserMiddleName);

this.userName = this.UserFirstName + " " + this.UserMiddleName;

Console.WriteLine("SenderActivity End.");
Console.ReadLine();

return base.Execute(executionContext);
}


#region Browsable Attributes


public static DependencyProperty UserFirstNameProperty = DependencyProperty.Register("UserFirstName", typeof(string), typeof(SenderActivity), new PropertyMetadata(DependencyPropertyOptions.Metadata, new Attribute[] { new ValidationOptionAttribute(ValidationOption.Required) }));

[DescriptionAttribute("UserFirstName")]
[CategoryAttribute("Input")]
[BrowsableAttribute(true)]
[DesignerSerializationVisibilityAttribute(DesignerSerializationVisibility.Visible)]
public string UserFirstName
{
get
{
return ((string)(base.GetValue(SenderActivity.UserFirstNameProperty)));
}
set
{
base.SetValue(SenderActivity.UserFirstNameProperty, value);
}
}


public static DependencyProperty UserMiddleNameProperty = DependencyProperty.Register("UserMiddleName", typeof(string), typeof(SenderActivity), new PropertyMetadata(DependencyPropertyOptions.Metadata, new Attribute[] { new ValidationOptionAttribute(ValidationOption.Required) }));

[DescriptionAttribute("UserMiddleName")]
[CategoryAttribute("Input")]
[BrowsableAttribute(true)]
[DesignerSerializationVisibilityAttribute(DesignerSerializationVisibility.Visible)]
public string UserMiddleName
{
get
{
return ((string)(base.GetValue(SenderActivity.UserMiddleNameProperty)));
}
set
{
base.SetValue(SenderActivity.UserMiddleNameProperty, value);
}
}


[DescriptionAttribute("UserName")]
[CategoryAttribute("Output")]
[BrowsableAttribute(true)]
[DesignerSerializationVisibilityAttribute(DesignerSerializationVisibility.Visible)]
public string UserName
{
get
{
return this.userName;
}
}

#endregion Browsable Attributes
}
}


2) Creating the receiver activity

I created a receiver activity named ReceiverActivity. In this activity, I am creating two properties, named UserLastName and SenderActivityName whose CategoryAttribute are set to Input. UserName property will accept/take Last Name from designer’s properties box.SenderActivityName property will be used to get the sender activity name.
Here I am just combining the LastName of receiver’s activity with the Name data of sender’s activity, to form user’s FullName.
To get the data from sender activity, we are using GetActivityByName function to get the activity instance and then calling its property to get the data.


string userName = ((SenderActivity)this.GetActivityByName(this.SenderActivityName, false)).UserName;


Following is the code snippet of ReceiverActivity.cs


using System;
using System.ComponentModel;
using System.ComponentModel.Design;
using System.Collections;
using System.Drawing;
using System.Linq;
using System.Workflow.ComponentModel;
using System.Workflow.ComponentModel.Design;
using System.Workflow.ComponentModel.Compiler;
using System.Workflow.ComponentModel.Serialization;
using System.Workflow.Runtime;
using System.Workflow.Activities;
using System.Workflow.Activities.Rules;

namespace MyWorkFlow.Activity
{
public partial class ReceiverActivity: SequenceActivity
{
public ReceiverActivity()
{
InitializeComponent();
}

protected override ActivityExecutionStatus Execute(ActivityExecutionContext executionContext)
{
if (null == executionContext)
throw new ArgumentNullException("executionContext");

Console.WriteLine("ReceiverActivity Started ...");

string userName = ((SenderActivity)this.GetActivityByName(this.SenderActivityName, false)).UserName;

Console.WriteLine("User Name from SenderActivity is : " + userName);
Console.WriteLine("User LastName is : " + this.UserLastName);

userName += " " + this.UserLastName;

Console.WriteLine("User FullName is : " + userName);
Console.WriteLine("ReceiverActivity End.");
Console.ReadLine();

return base.Execute(executionContext);
}

#region Browsable Attributes

public static DependencyProperty UserLastNameProperty = DependencyProperty.Register("UserLastName", typeof(string), typeof(ReceiverActivity), new PropertyMetadata(DependencyPropertyOptions.Metadata, new Attribute[] { new ValidationOptionAttribute(ValidationOption.Required) }));

[DescriptionAttribute("UserLastName")]
[CategoryAttribute("Input")]
[BrowsableAttribute(true)]
[DesignerSerializationVisibilityAttribute(DesignerSerializationVisibility.Visible)]
public string UserLastName
{
get
{
return ((string)(base.GetValue(ReceiverActivity.UserLastNameProperty)));
}
set
{
base.SetValue(ReceiverActivity.UserLastNameProperty, value);
}
}

public static DependencyProperty SenderActivityNameProperty = DependencyProperty.Register("SenderActivityName", typeof(string), typeof(ReceiverActivity), new PropertyMetadata(DependencyPropertyOptions.Metadata, new Attribute[] { new ValidationOptionAttribute(ValidationOption.Required) }));

[DescriptionAttribute("SenderActivityName")]
[CategoryAttribute("Input")]
[BrowsableAttribute(true)]
[DesignerSerializationVisibilityAttribute(DesignerSerializationVisibility.Visible)]
public string SenderActivityName
{
get
{
return ((string)(base.GetValue(ReceiverActivity.SenderActivityNameProperty)));
}
set
{
base.SetValue(ReceiverActivity.SenderActivityNameProperty, value);
}
}

#endregion Browsable Attributes
}
}


3) Creating Workflow to consume both Sender and Receive activities

After building the project with above two activities, project’s toolbox will displays both custom sender and receiver activities.
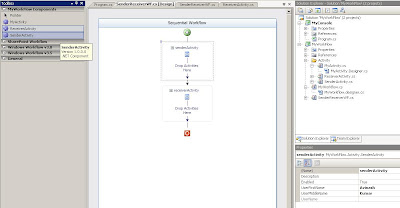


Add a Sequential Workflow in project, here I named it SenderReceiverWF.cs.
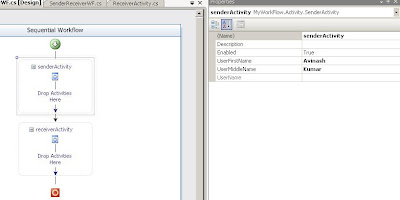
First select SenderActivity in toolbox, drag-n-drop it to workflow designer area. Then select ReceicerActivity in toolbox, drag-n-drop it to workflow designer, just below the SenderActivity (as shown in above figure).Now, select SenderActivity in workflow designer, open its property box. Set the Activity’s name, UserFirstName, and UserMiddleName properties in it (here I am writing senderActivity, Avinash, and Kumar respectively in properties values).


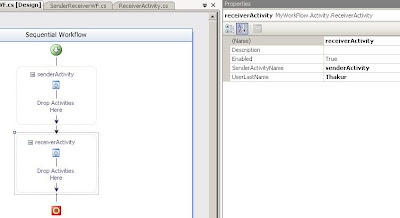
Now, select ReceiverActivity in workflow designer, open its property box. Set Activity’s name, SenderActivityName, and UserLastName properties in it (here I am writing receiverActivity, senderActivity (same name that I used for sender activity), and Thakur respectively in properties values).


Rebuild the project to use it in a console application.


4) Create a Console application to test above workflow

Add a new console project in solution explorer, to test the above workflow. Just consume the workflow in it (explained in detail, in my earlier post).

Following is the code snippet for console application class:


using System;
using System.Collections.Generic;
using System.Linq;
using System.Text;

using System.Threading;
using System.Workflow.Runtime;
using System.Workflow.Runtime.Hosting;

namespace MyConsole
{
class Program
{
static void Main(string[] args)
{
using (WorkflowRuntime workflowRuntime = new WorkflowRuntime())
{
AutoResetEvent waitHandle = new AutoResetEvent(false);

workflowRuntime.WorkflowCompleted += delegate(object sender, WorkflowCompletedEventArgs e)
{
waitHandle.Set();
};

workflowRuntime.WorkflowTerminated += delegate(object sender, WorkflowTerminatedEventArgs e)
{
Console.WriteLine(e.Exception.Message);
waitHandle.Set();
};

WorkflowInstance instance = workflowRuntime.CreateWorkflow(typeof(MyWorkFlow.SenderReceiverWF));
instance.Start();

waitHandle.WaitOne();
}

Console.ReadLine();
}
}
}


Now it’s time to see the output of above work. When we run the application, first SenderActivity will get executed and then ReceiverActivity, as per the sequence defined in the workflow.

Following is the snapshot of SenderActivity’s output (here it’s wait for user input to execute second activity).
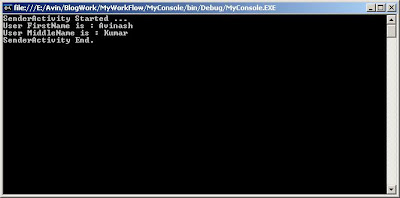


After pressing any key, the second activity i.e. Receiver activity get executed (as shown in below figure).

Tuesday, April 22, 2008

Browsable Attribute/Property of Custom Activity in ASP.Net Workflow

In continuation with my earlier article Custom Activity in ASP.Net Workflow

1) To add a browsable attribute/property in your custom activity, you have insert following code in your custom activity class:


public static DependencyProperty OwnerNameProperty = DependencyProperty.Register("OwnerName", typeof(string), typeof(MyActivity), new PropertyMetadata(DependencyPropertyOptions.Metadata, new Attribute[] { new ValidationOptionAttribute(ValidationOption.Required) }));

[DescriptionAttribute("OwnerName")]
[CategoryAttribute("Input")]
[BrowsableAttribute(true)]
[DesignerSerializationVisibilityAttribute(DesignerSerializationVisibility.Visible)]
public string OwnerName
{
get
{
return ((string)(base.GetValue(MyActivity.OwnerNameProperty)));
}
set
{
base.SetValue(MyActivity.OwnerNameProperty, value);
}
}

Here the custom property name is “OwnerName”.

2) You can access your property in your custom activity, by simply access it like “this.PropertyName”. E.g,


Console.WriteLine("OwnerName : " + this.OwnerName);

In my case, I have inserted the above code in Activity’s “Execute” method.

3) After doing the required changes. To test your custom property, remove your activity from workflow designer and again Drag-n-Drop in Workflow designer from toolbox. Now to set your property, select the activity in workflow designer. In properties window, you will see your custom property against your custom activity. Here you will see “OwnerName” property in “MyActivity”.


4) After setting the property, rebuild the whole application, i.e. Workflow and Console application project. Run the console application. Following is the output window of console application:


Google